3.5 Telemetry and Commands using the MQTT protocol with XIAO ESP32C3
In the previous section, we learned how to send HTTP GET or POST requests from the XIAO ESP32C3 to a local machine on a local area network via Wi-Fi. In this section, we’ll step through: communication protocols, Message Queuing Telemetry Transport (MQTT), telemetry (data gathered from sensors and sent to the cloud), and commands (messages sent from the cloud to a device instructing it to do something).
3.5.1 Background Knowledge
3.5.1.1 IoT (Internet of Things)
The “I” in IoT stands for Internet—cloud connectivity and services that enable many of the functions of IoT devices, from gathering sensor measurements linked to devices, to sending messages to control actuators. IoT devices typically connect to a single IoT cloud service using standard communication protocols, and this service is tightly integrated with the rest of your IoT application, from AI services making intelligent decisions around data, to web applications for control or reporting.
🎓 Data collected from sensors and sent to the cloud is called telemetry.
IoT devices can also receive information from the cloud. This information typically consists of commands—instructions to perform internal actions (such as rebooting or updating firmware) or to actuate (e.g., turning on a light).
3.5.1.2 Communication Protocols
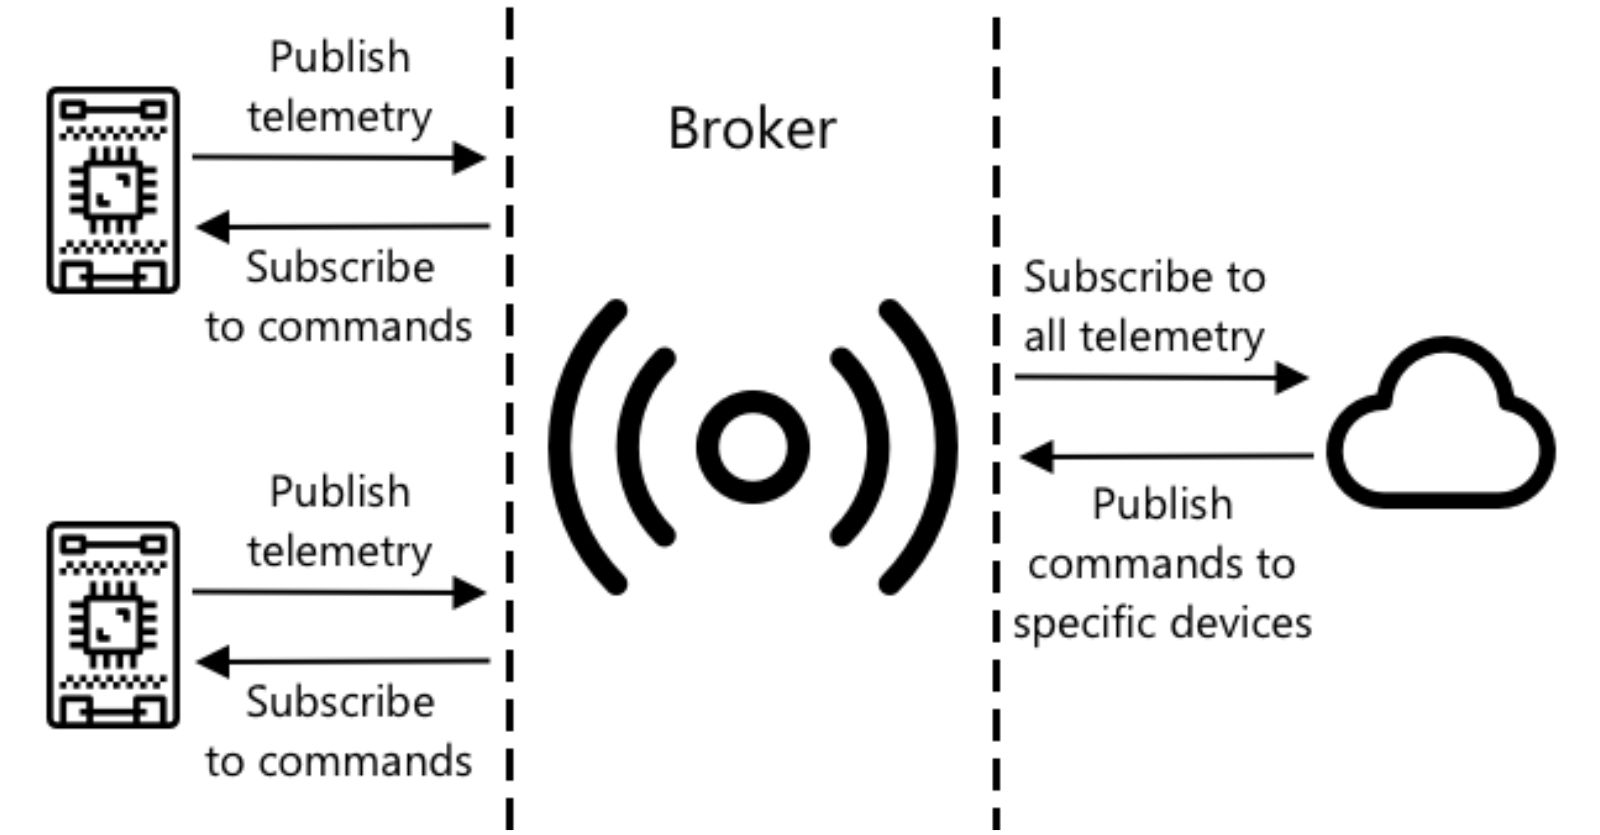
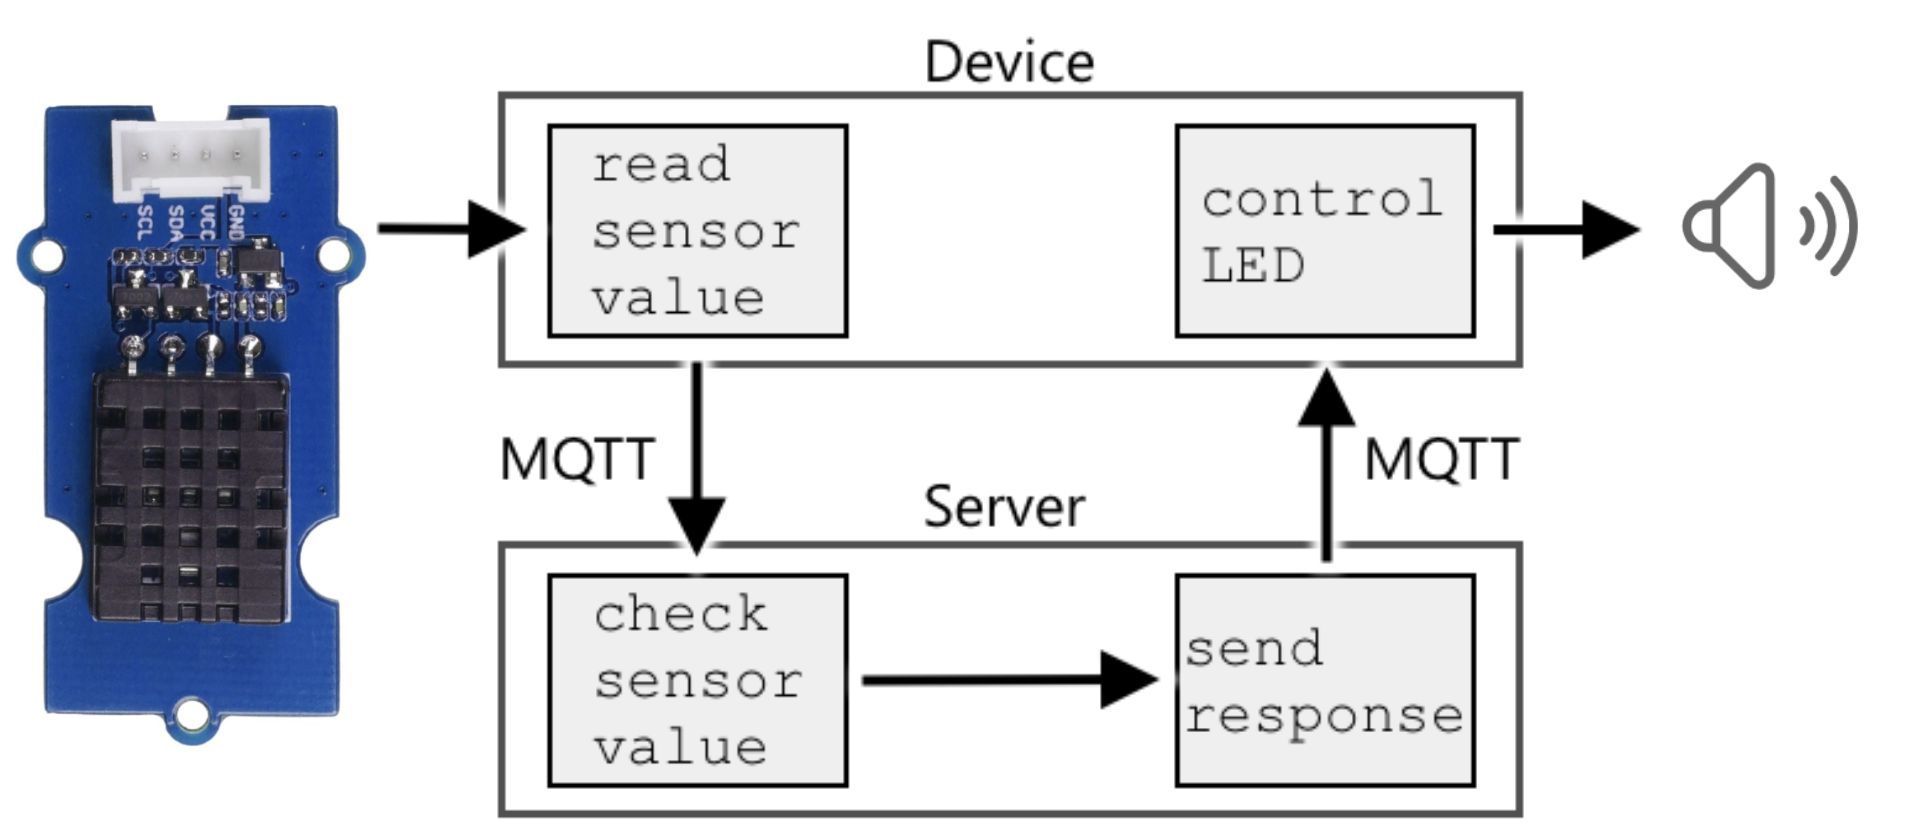
There are many popular communication protocols that IoT devices use to communicate with the internet. The most popular are based around the publishing/subscribing of messages through some agent: IoT devices connect to the agent, publish telemetry data and subscribe to commands. Cloud services also connect to the agent, subscribe to all telemetry information, and publish commands to specific devices or groups of devices, as shown in the figure below.
MQTT is the most popular communication protocol for IoT devices and will be covered in this section. Other protocols include AMQP and HTTP/HTTPS, which we introduced in the previous section.
3.5.1.3 Message Queuing Telemetry Transport (MQTT)
MQTT is short for Message Queuing Telemetry Transport. It is a messaging protocol based on the publish/subscribe paradigm under the ISO standard: ISO/IEC PRF 20922. It can be seen as a “bridge for data delivery”. It operates on top of the TCP/IP protocol stack and is a publish/subscribe type messaging protocol designed for remote devices with poor hardware performance and poor network conditions. It is a lightweight, open standard messaging transport protocol that can send messages between devices. Originally designed in 1999 for monitoring oil pipelines, it was published as an open standard by IBM 15 years later.
The biggest advantage of MQTT is that it provides a real-time and reliable messaging service for connecting remote devices with minimal code and limited bandwidth. As a low-overhead, low-bandwidth consumption instant communication protocol, it is widely used in IoT, small devices, mobile applications, and so on.
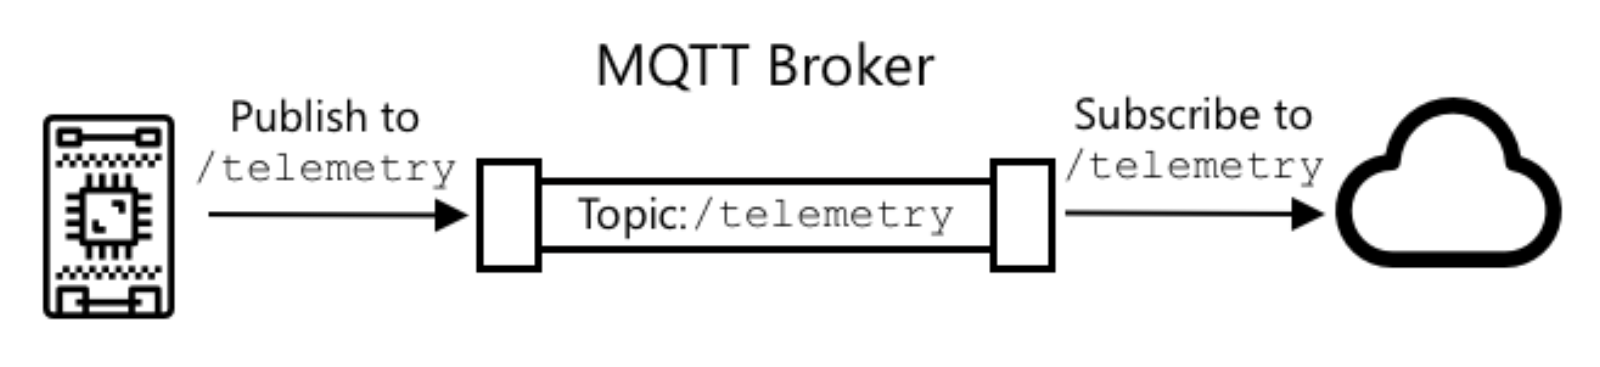
MQTT has one broker and multiple clients. All clients connect to the broker, which then routes messages to the relevant clients. Messages are routed using named topics, not sent directly to a single client. Clients can publish to a topic, and any client subscribed to that topic will receive the message.
✅ Do some research. If you have a large number of IoT devices, how can you ensure that your MQTT broker can handle all messages?
Some Open Source MQTT Brokers
While we can set up our own MQTT broker if circumstances allow, you might not be ready to delve into server and application setup yet. If you’re just learning, you can start with some open source MQTT brokers.
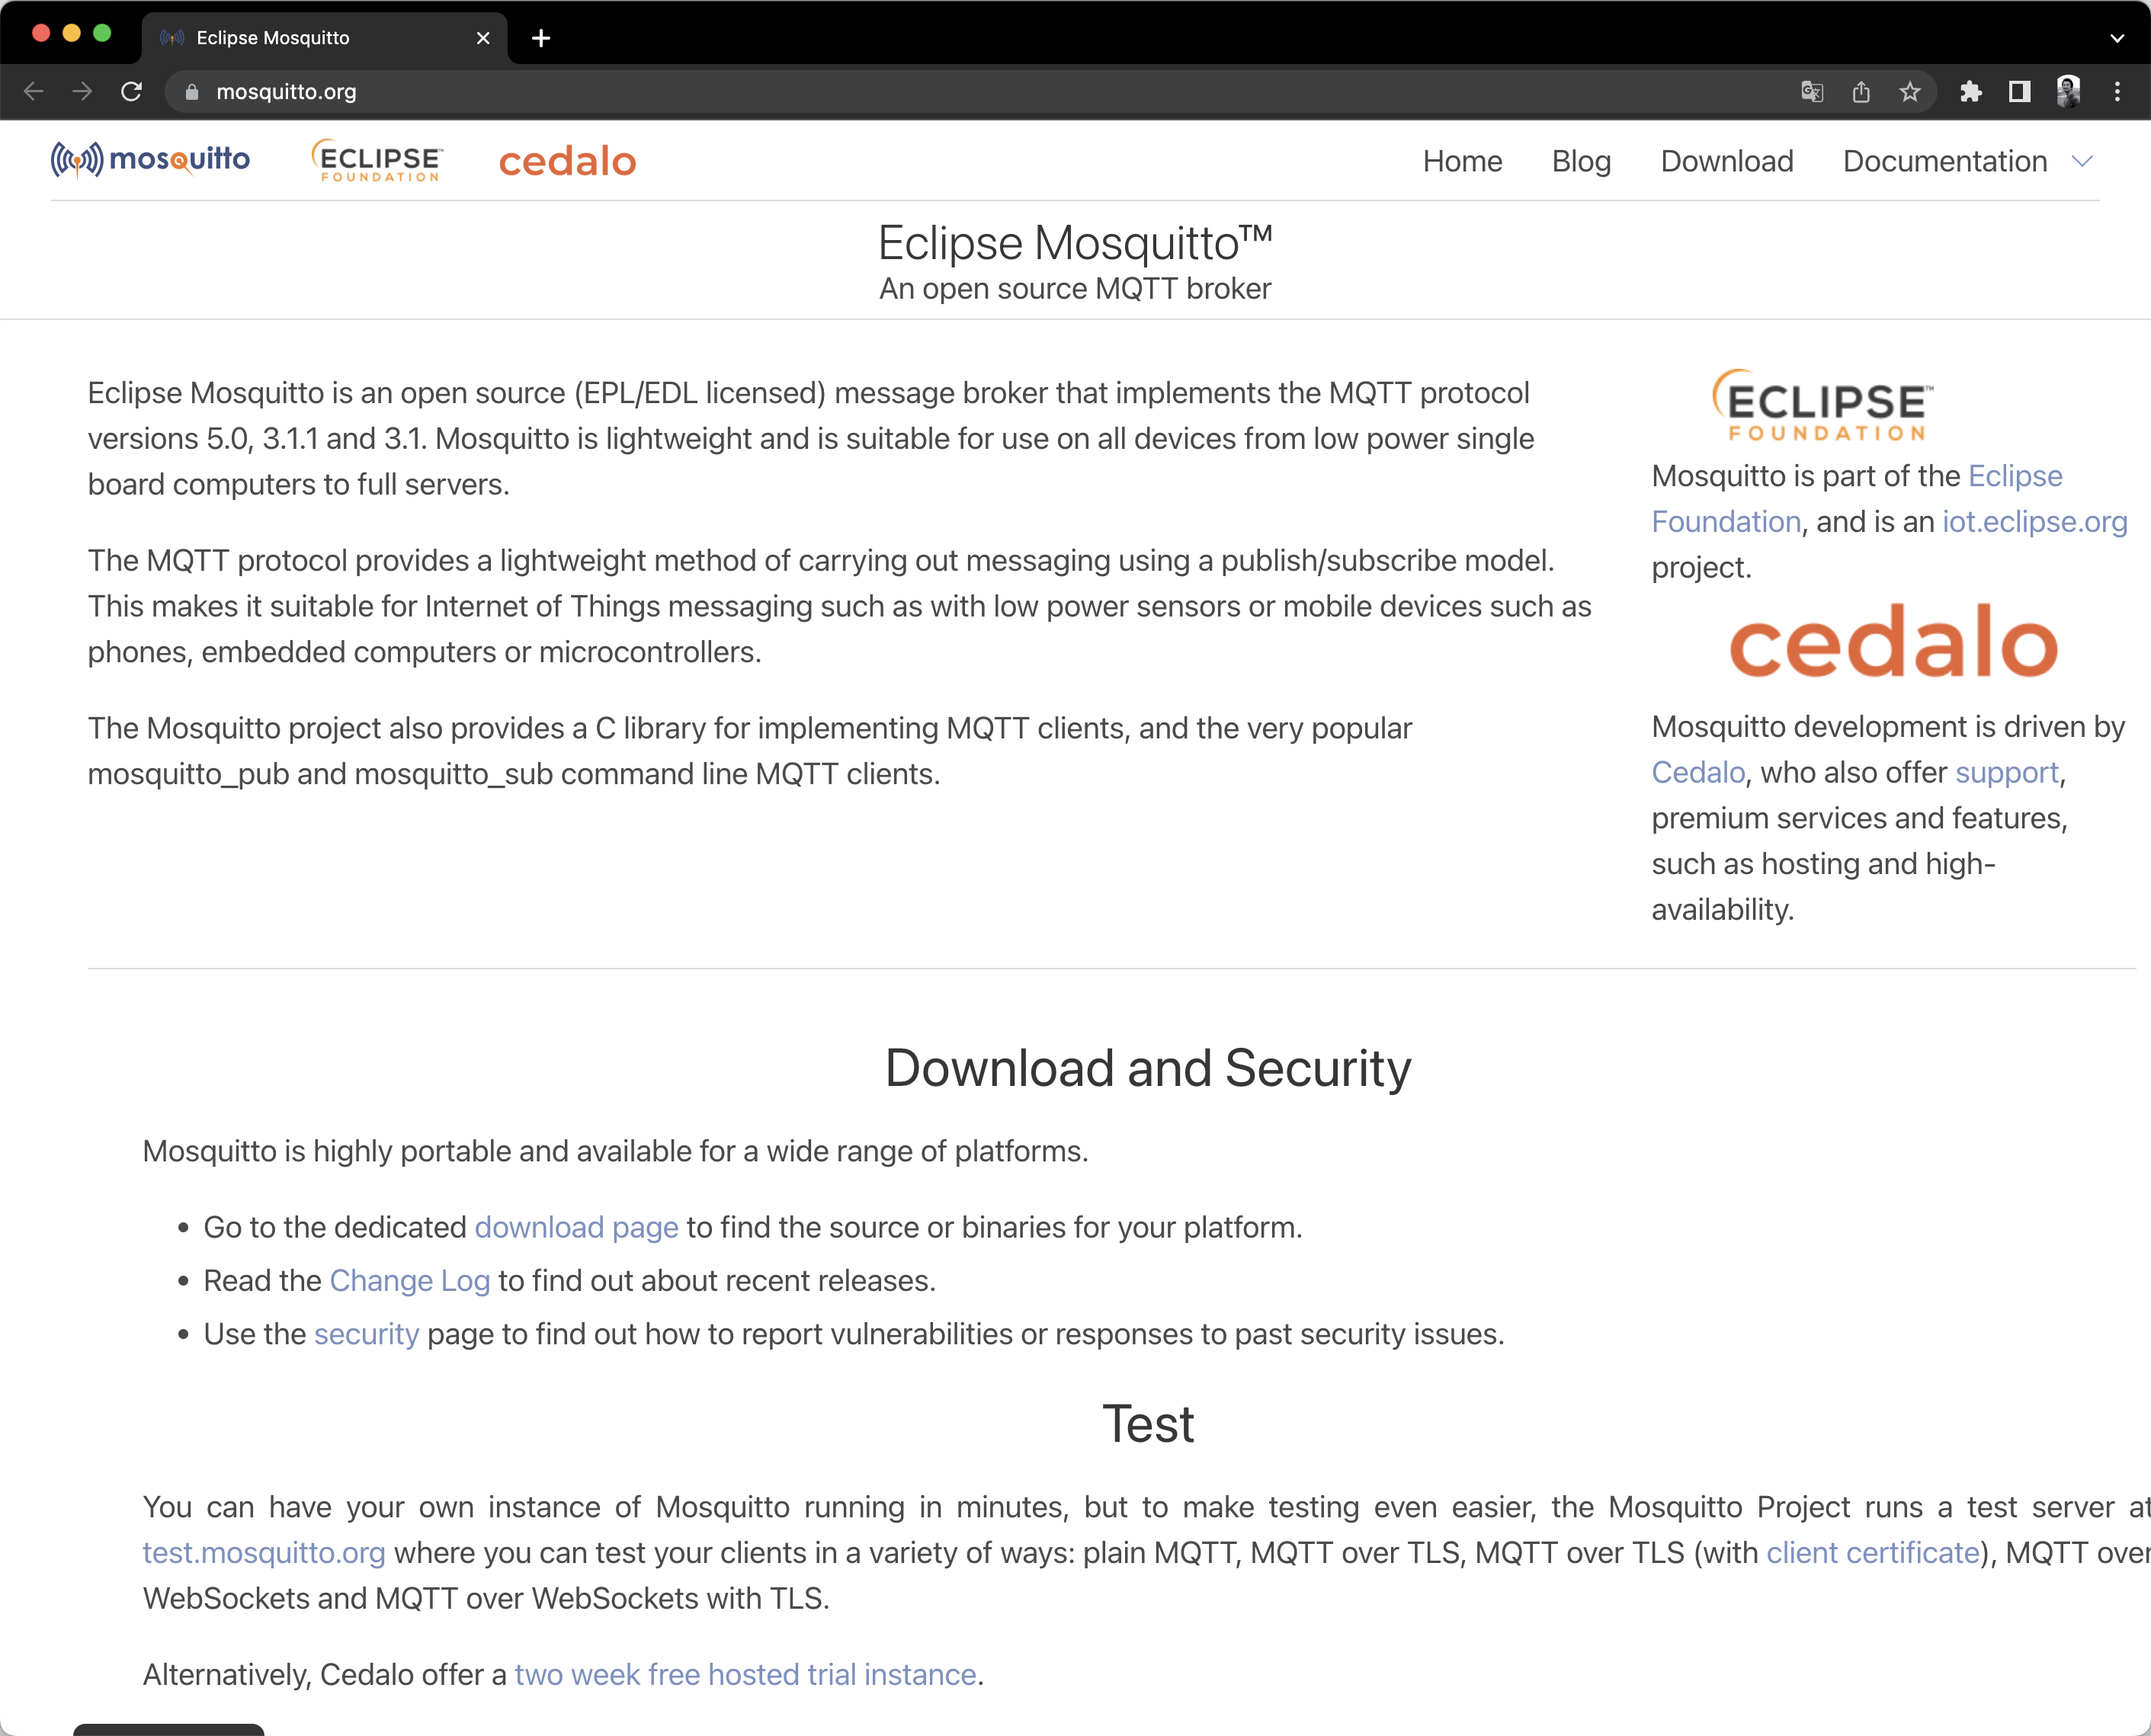
Eclipse Mosquitto 🔗 https://www.mosquitto.org/
This is an open source MQTT broker. Instead of dealing with the complexities of setting up an MQTT broker as part of this task, this test broker is publicly available at test.mosquitto.org and doesn’t require account setup. It’s a great tool for testing MQTT clients and servers.
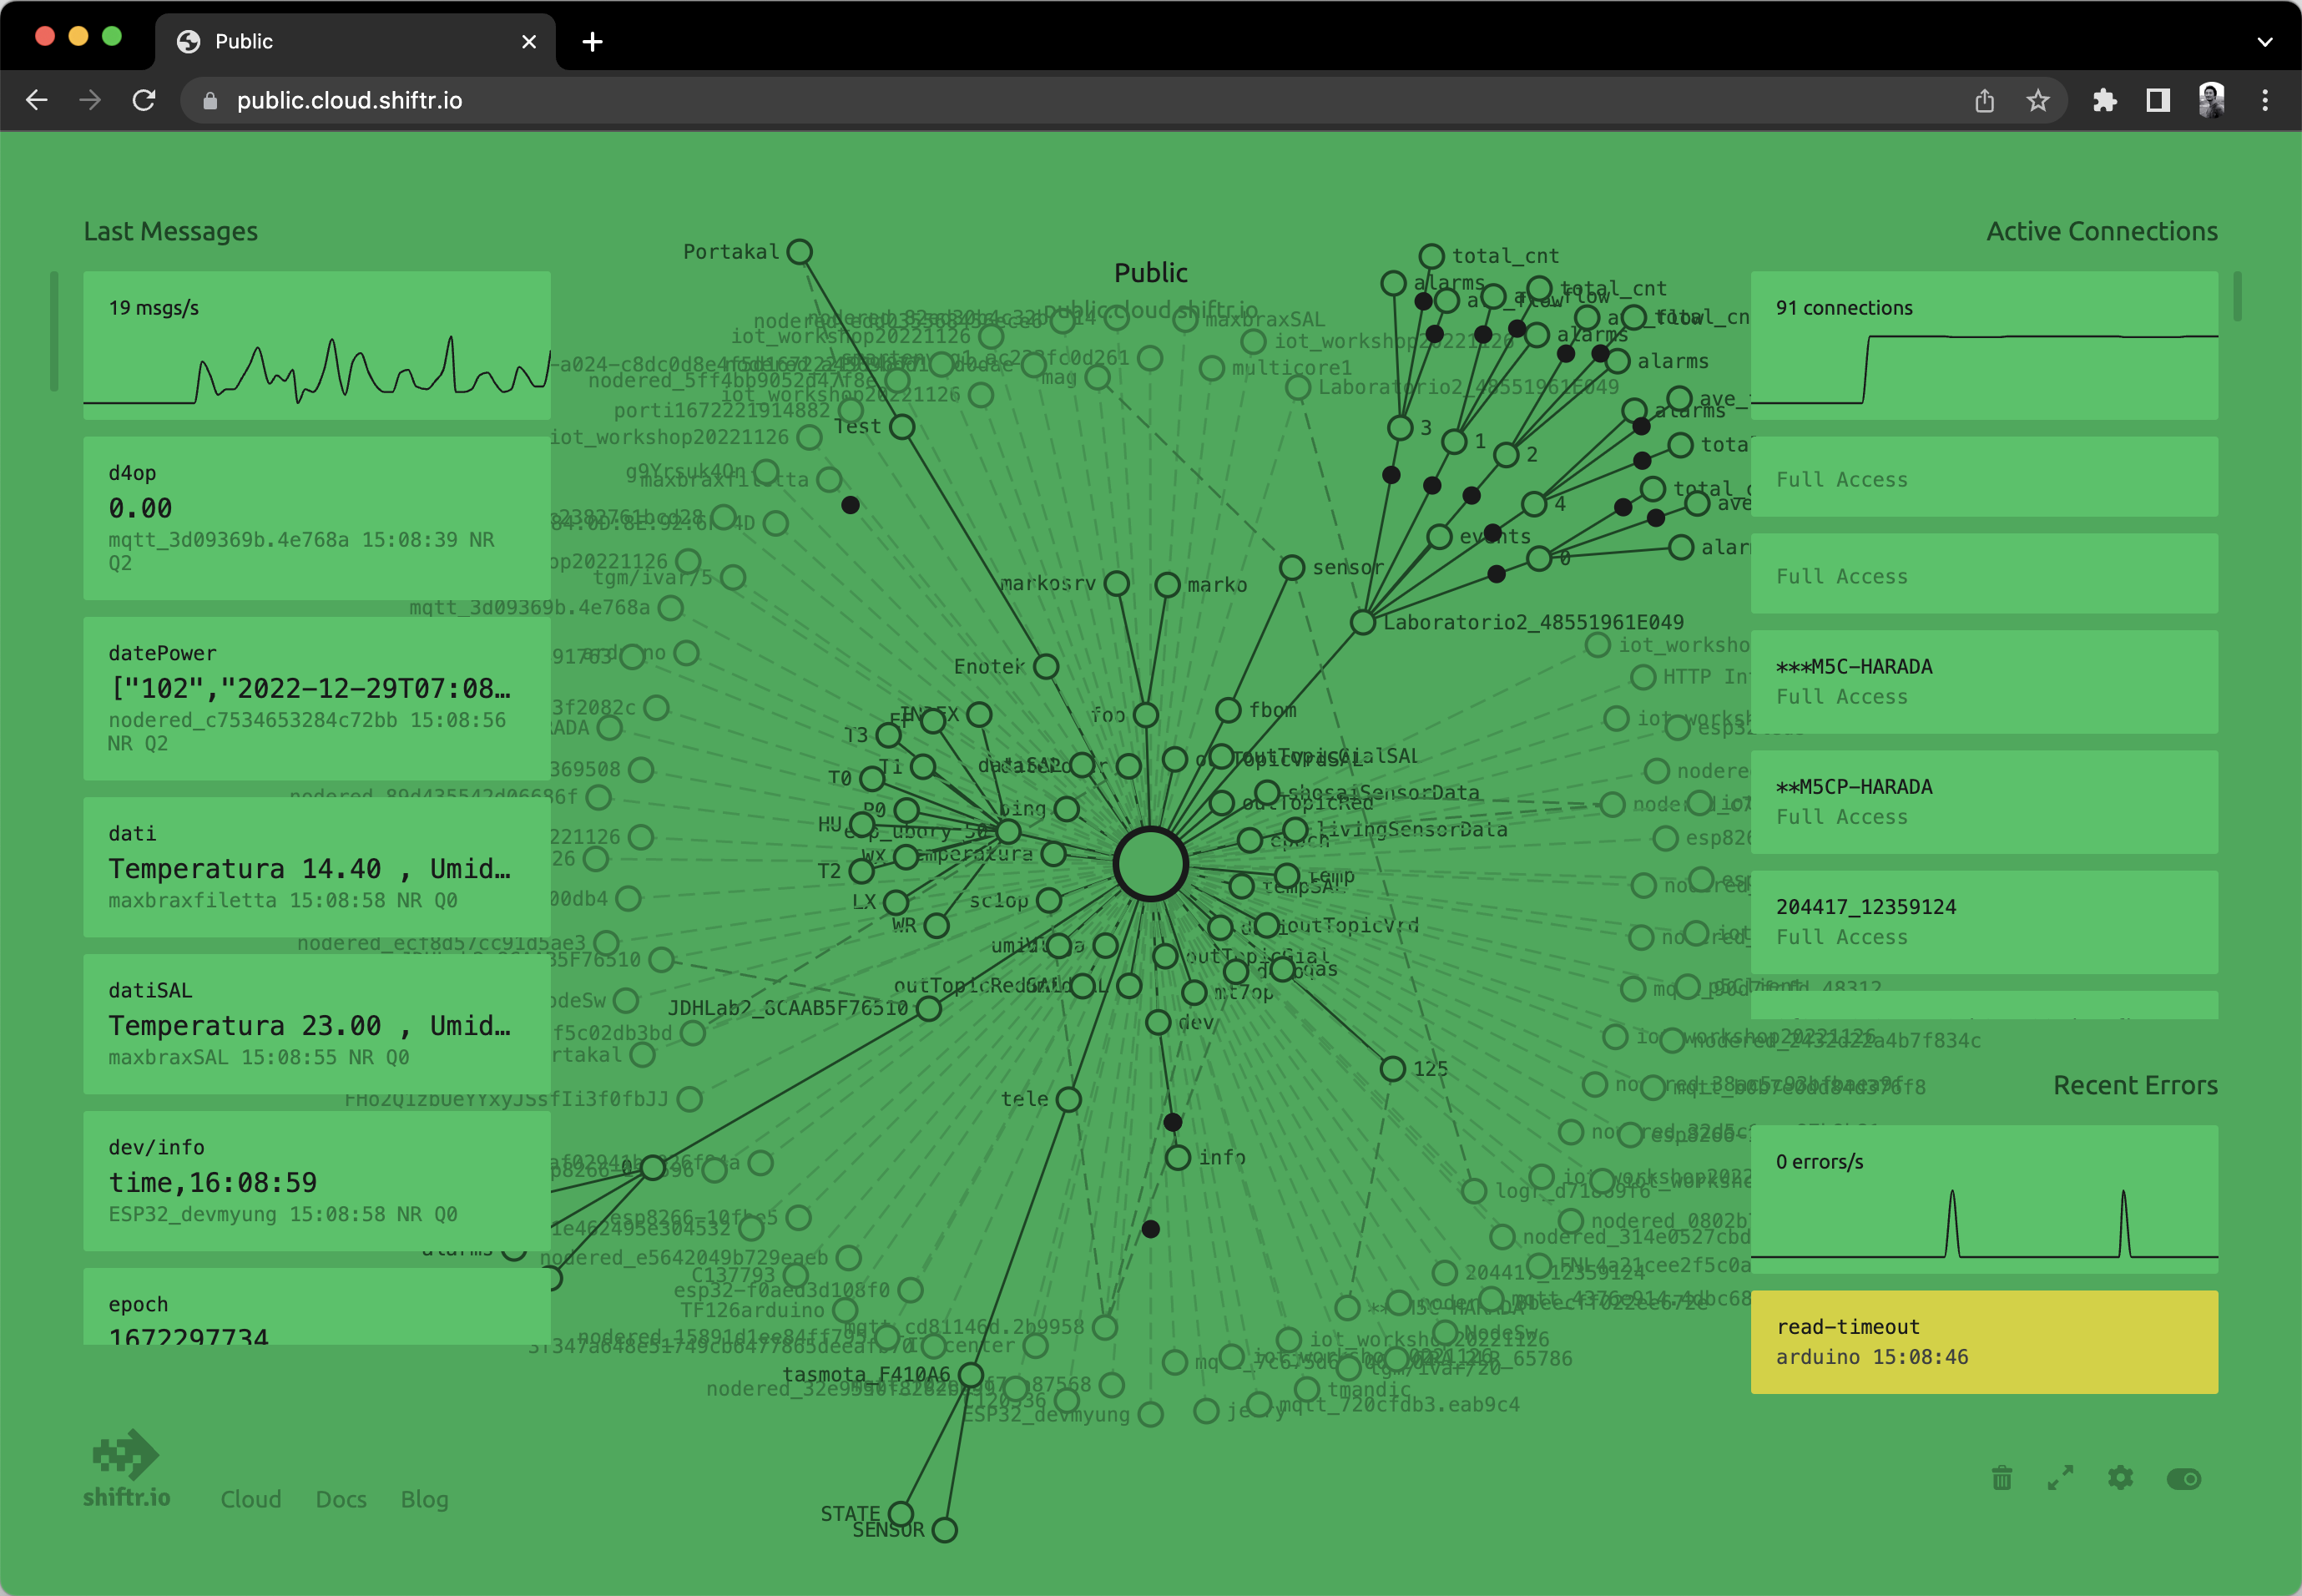
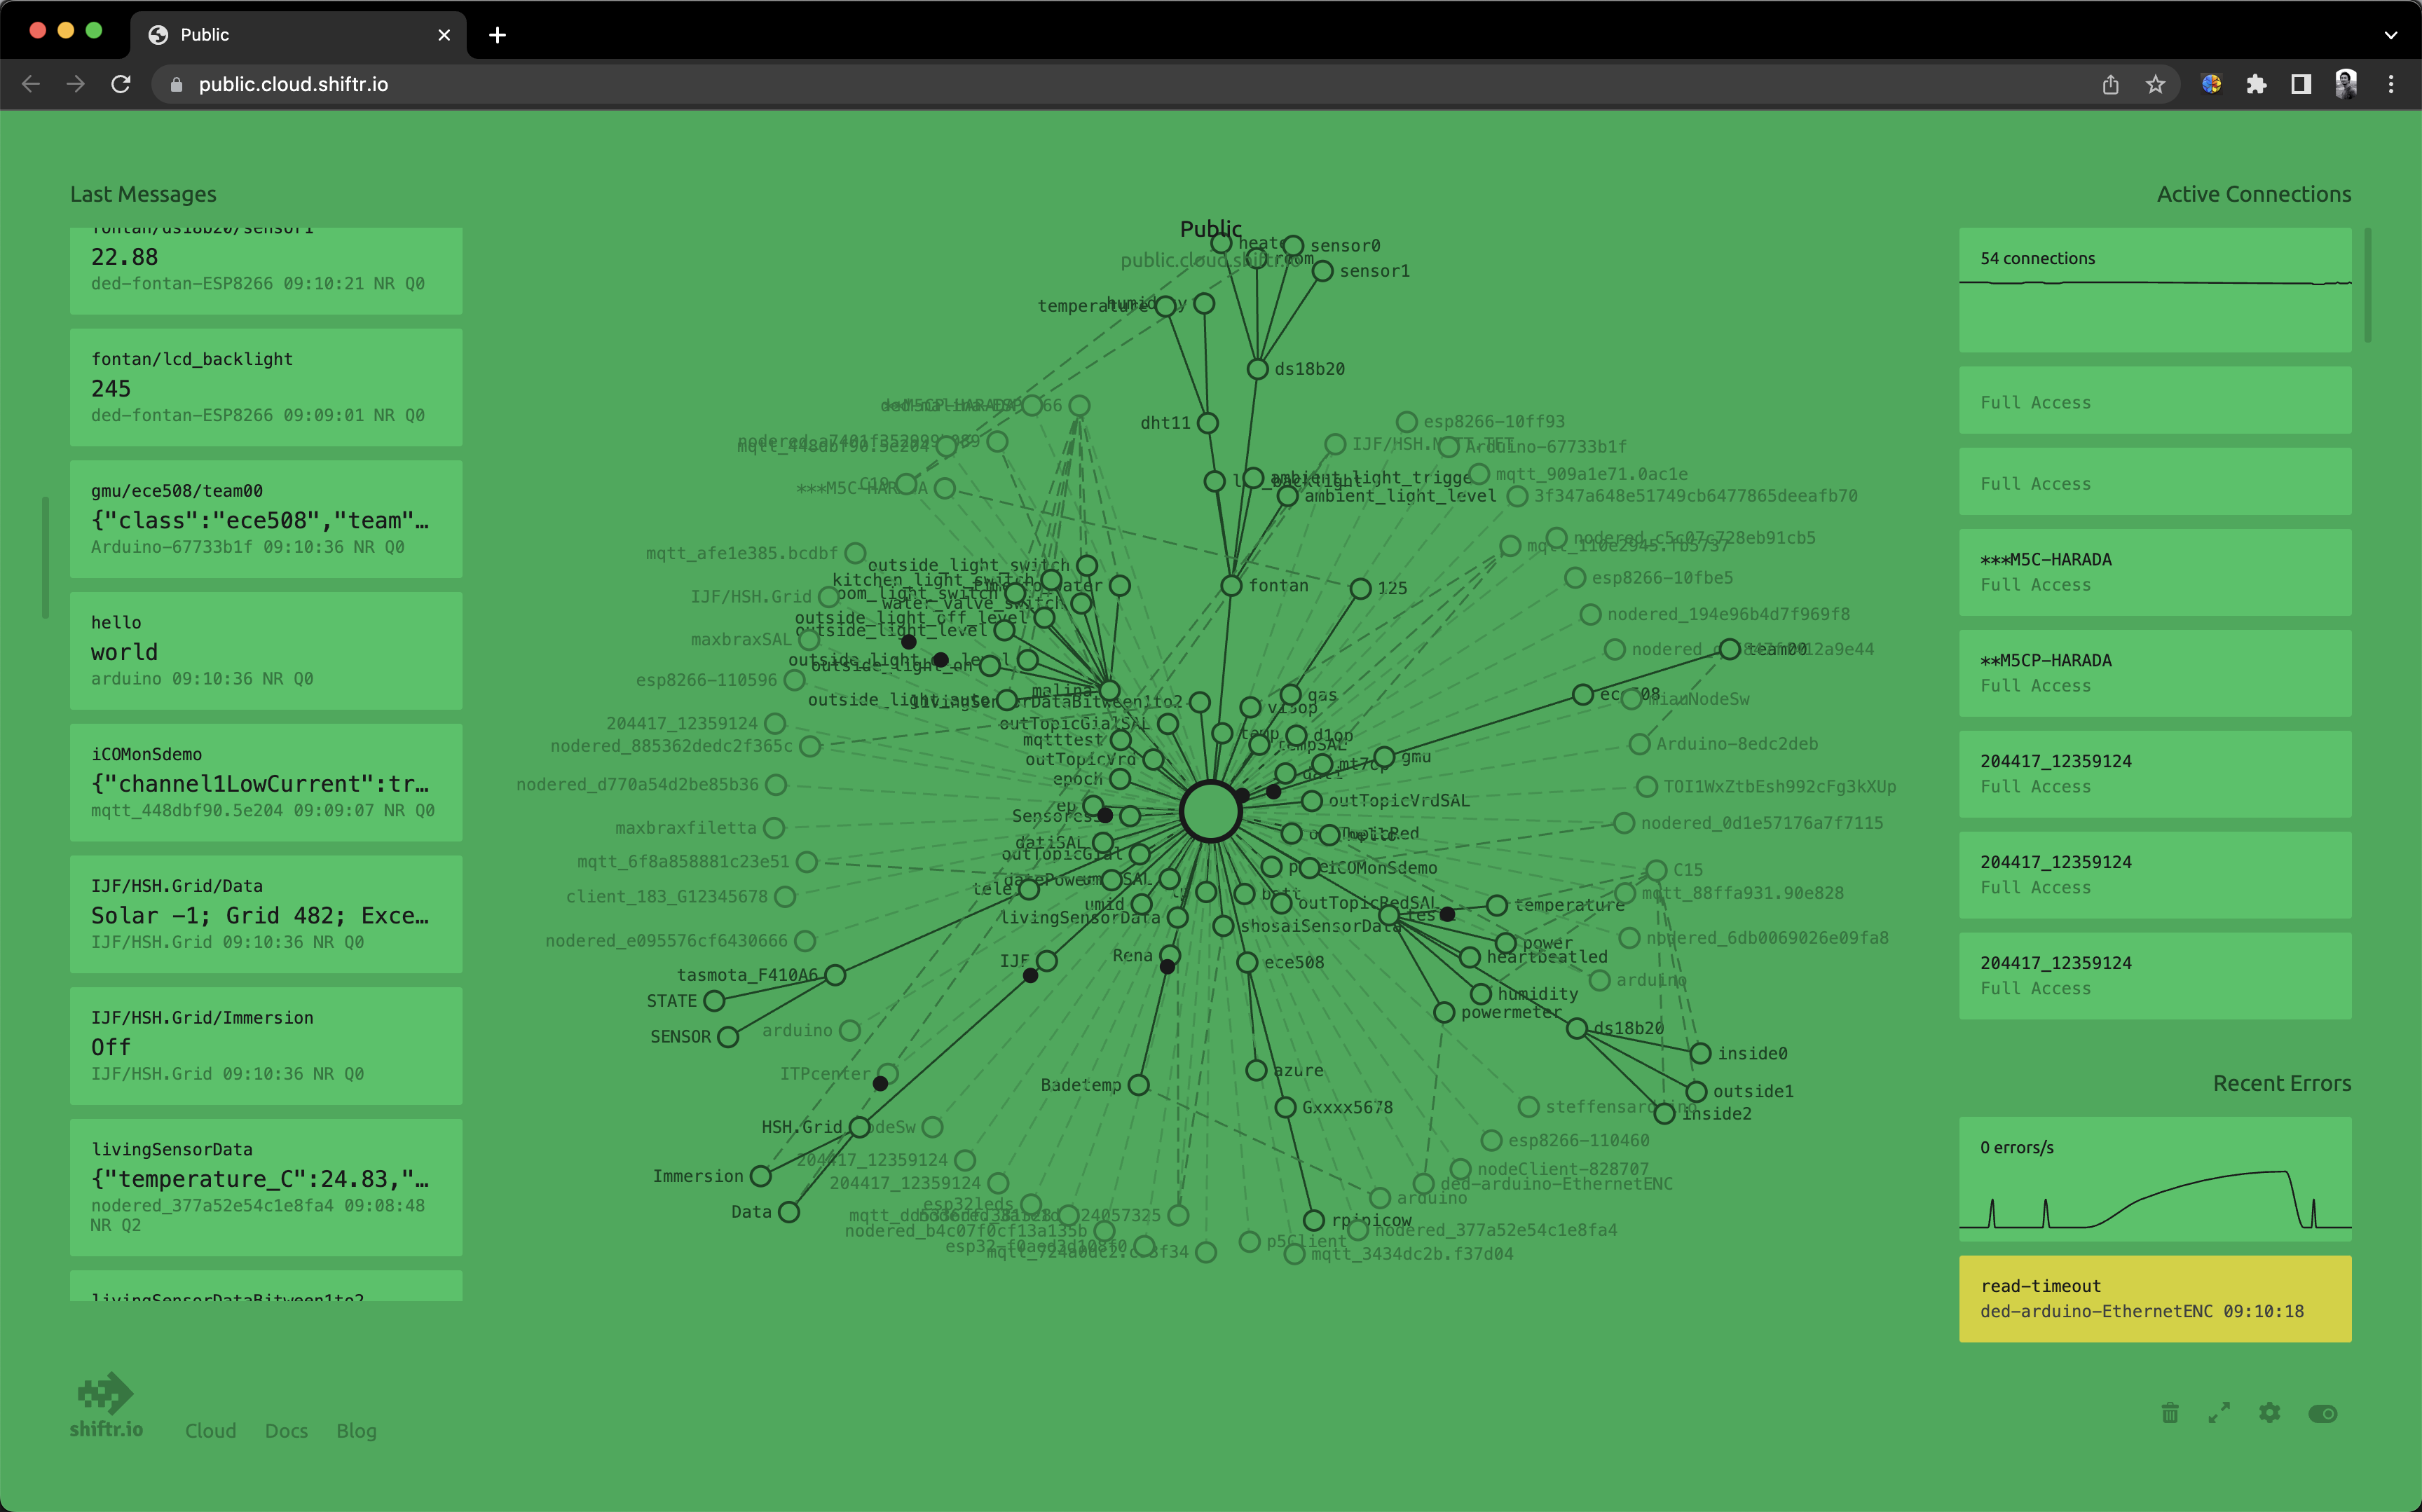
shiftr.io
An IoT platform for interconnected projects, quickly connect hardware and software with its cloud service and desktop applications. The platform also provides a clear view of all connections, topics, and messages in the network through real-time charts. The shiftr.io broker supports MQTT and HTTP for publishing, subscribing, and retrieving messages, and the platform supports free accounts, enough for us to learn and use. They also provide a public server at public.cloud.shiftr.io with username public on ports 1883 (MQTT) and 8883 (MQTTS). The animated view of connected services and data being exchanged on the public server is very cool, as shown in the image below.
HiveMQ
HiveMQ is a cloud-based MQTT platform, offering scalable, secure, and reliable IoT communication services. HiveMQ can help enterprises and developers quickly build and manage IoT applications, supporting millions of devices and messages.
3.5.2 Task 1: Connect the XIAO ESP32C3 to the MQTT Broker
The first step to adding internet control to your smart temperature and humidity meter is to connect the XIAO ESP32C3 to an MQTT broker.
In this part of the section, you’ll connect your smart temperature and humidity meter from Section 2.2 to the internet, enabling it to provide telemetry and be remotely controlled. Later in this section, your device will send a telemetry message via MQTT to a public MQTT broker, which will be received by some server code you’ll write. This code will check the temperature and humidity values, and send a command message to the device, telling it to turn a buzzer on or off.
One real-world use of this setup would be in a large indoor space with many temperature and humidity sensors, such as a farm. Before deciding to turn on air conditioning, data can be gathered from multiple temperature and humidity sensors. If only one sensor reading exceeds the threshold, but other sensor readings are normal, this can prevent the entire air conditioning system from being turned on.
✅ Can you think of other situations where an evaluation of data from multiple sensors is required before issuing a command?
💁 Remember, this test broker is public and unsecure, and anyone can listen in on what you’re publishing, so it should not be used for any data that needs to be kept confidential.
Follow the related steps below to connect your device to the MQTT broker we introduced earlier: public.cloud.shiftr.io.
Add the arduino-mqtt library
Before you start programming the XIAO ESP32C3 with the Arduino IDE, you need to add the necessary libraries. Type the library URL 🔗 https://github.com/256dpi/arduino-mqtt into your browser’s address bar to go to the GitHub page. Click on Code→Download ZIP to download the resource pack arduino-mqtt-master.zip to your local machine, as shown in the image below.

From the menu bar, select Sketch→Include Library→Add .ZIP Library to add the resource pack arduino-mqtt-master.zip you downloaded in the previous step. Continue until you see a message indicating successful library loading.
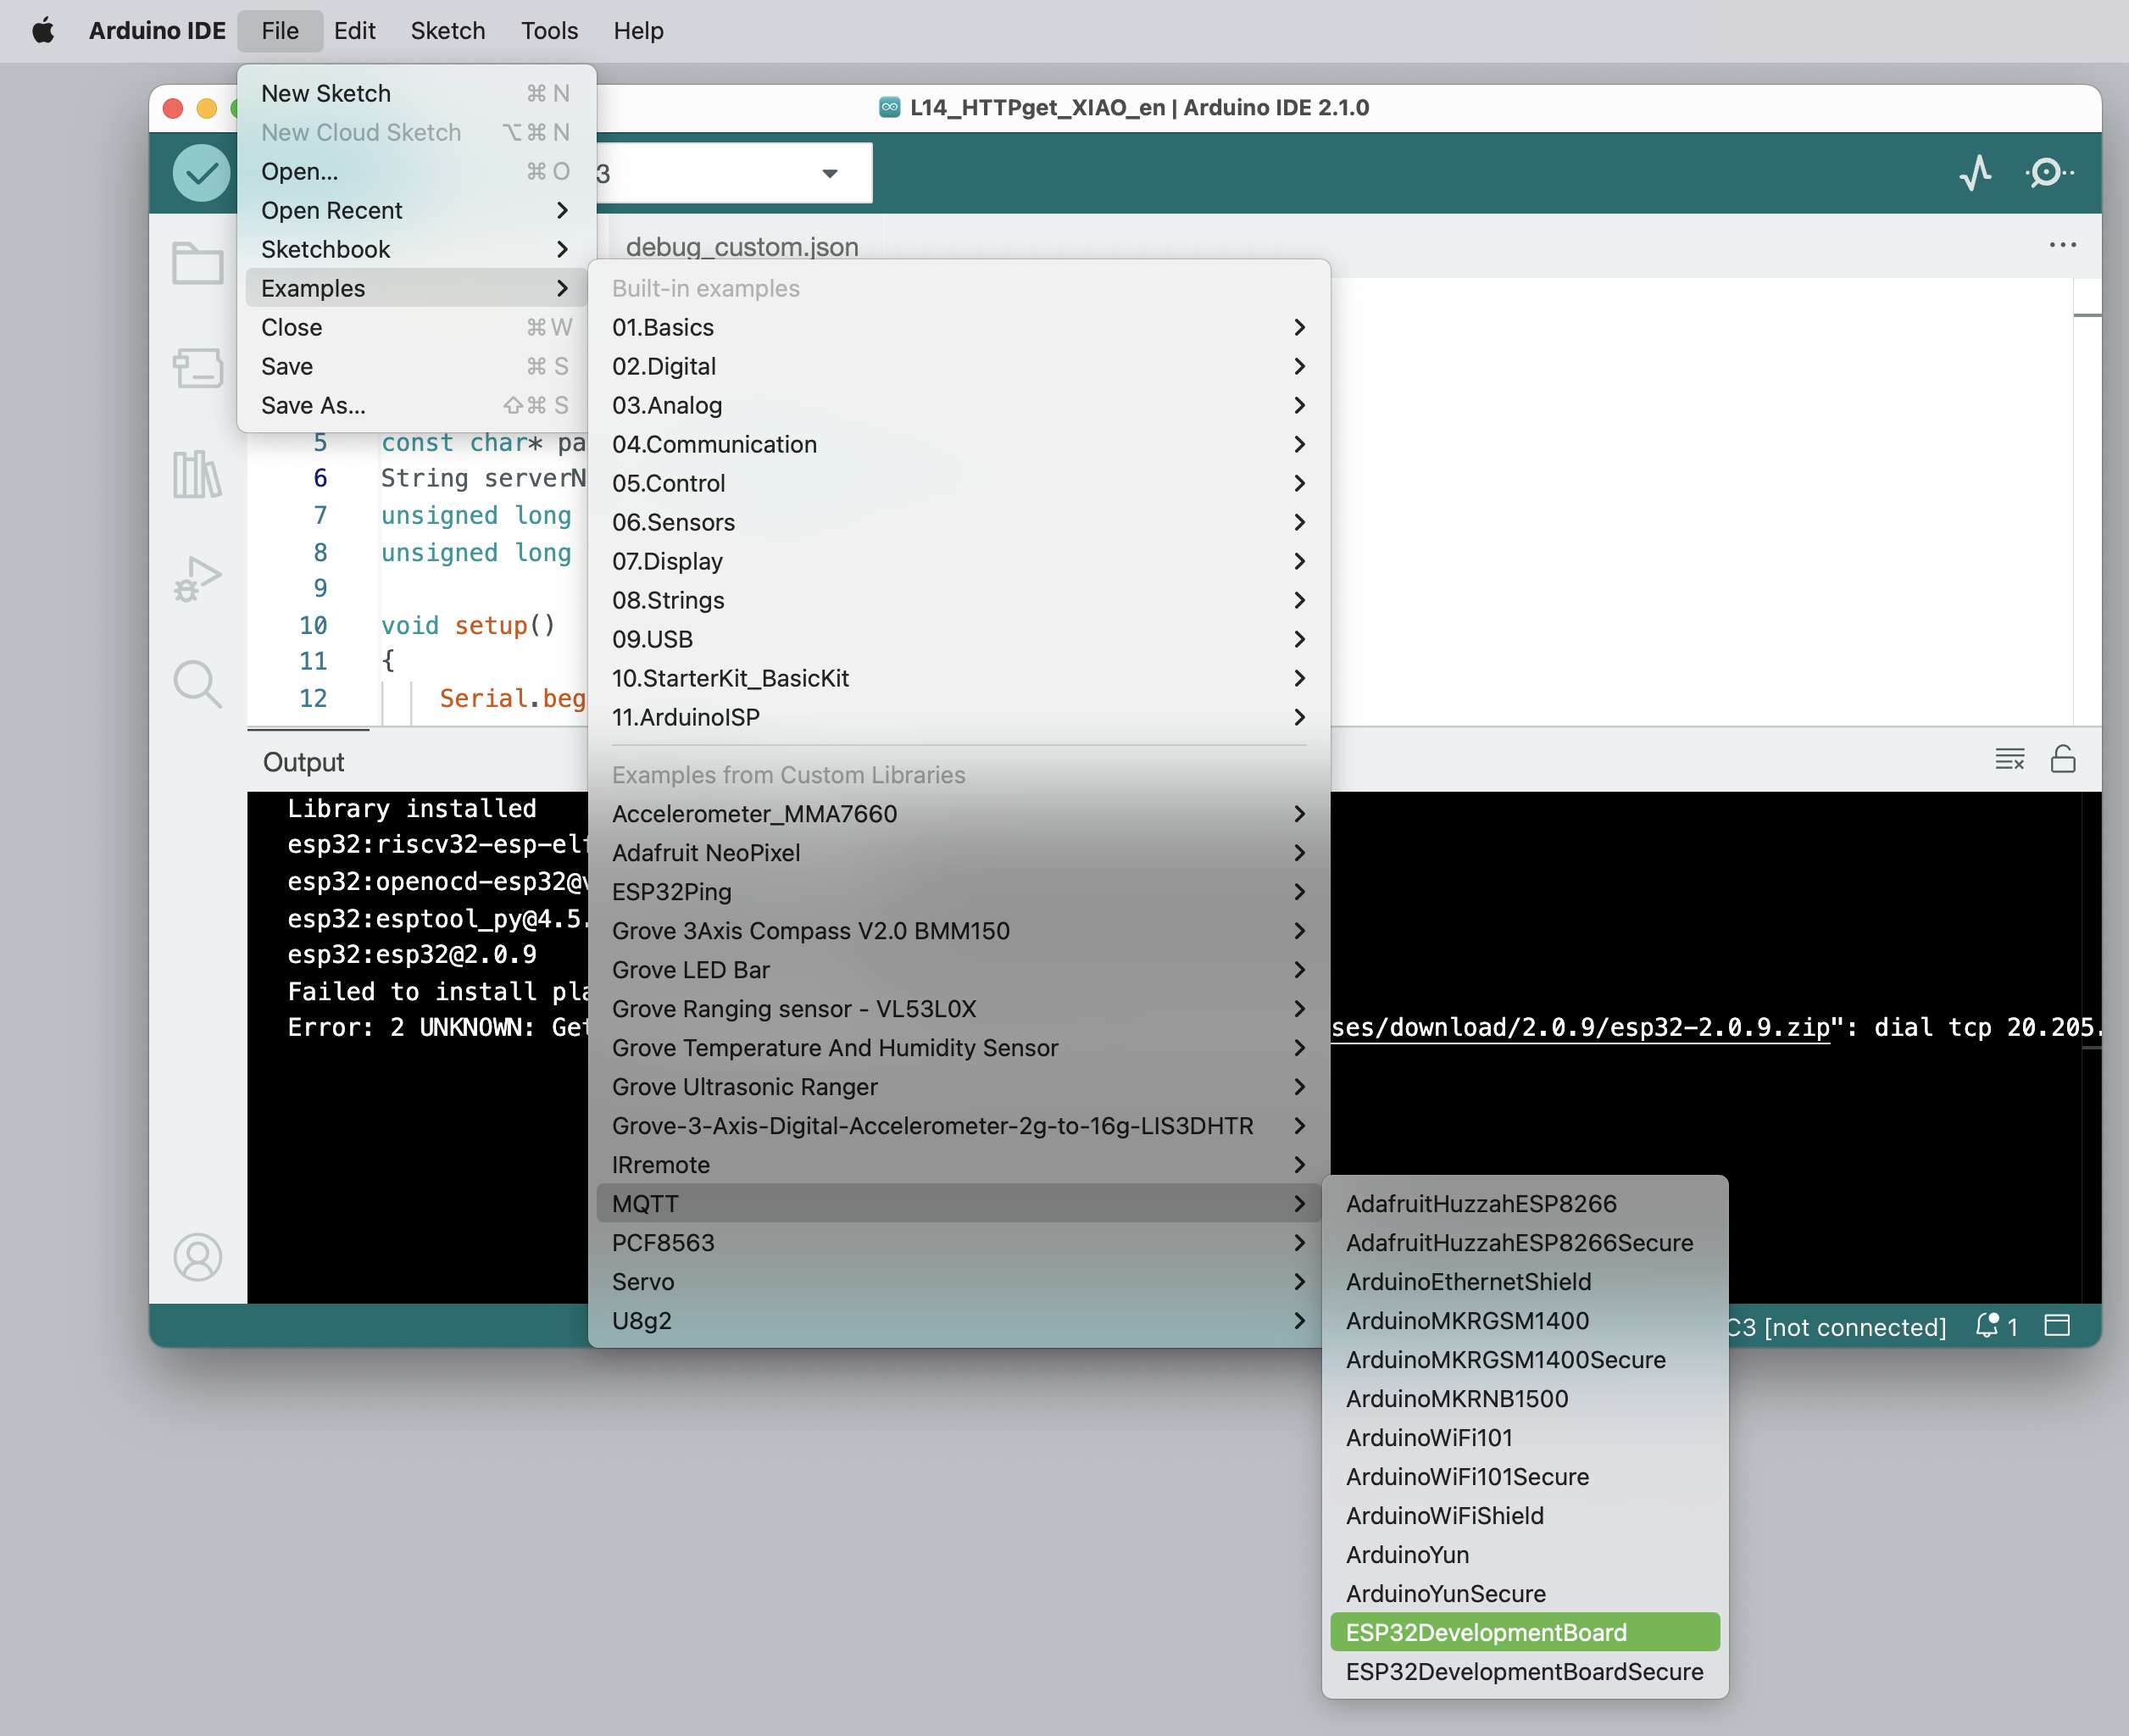
Run the ESP32 MQTT example
After the library is loaded successfully, open the “ESP32DevelopmentBoard” example in the Arduino IDE through the following path: File→Examples→MQTT→ESP32DevelopmentBoard, as shown in the image below.
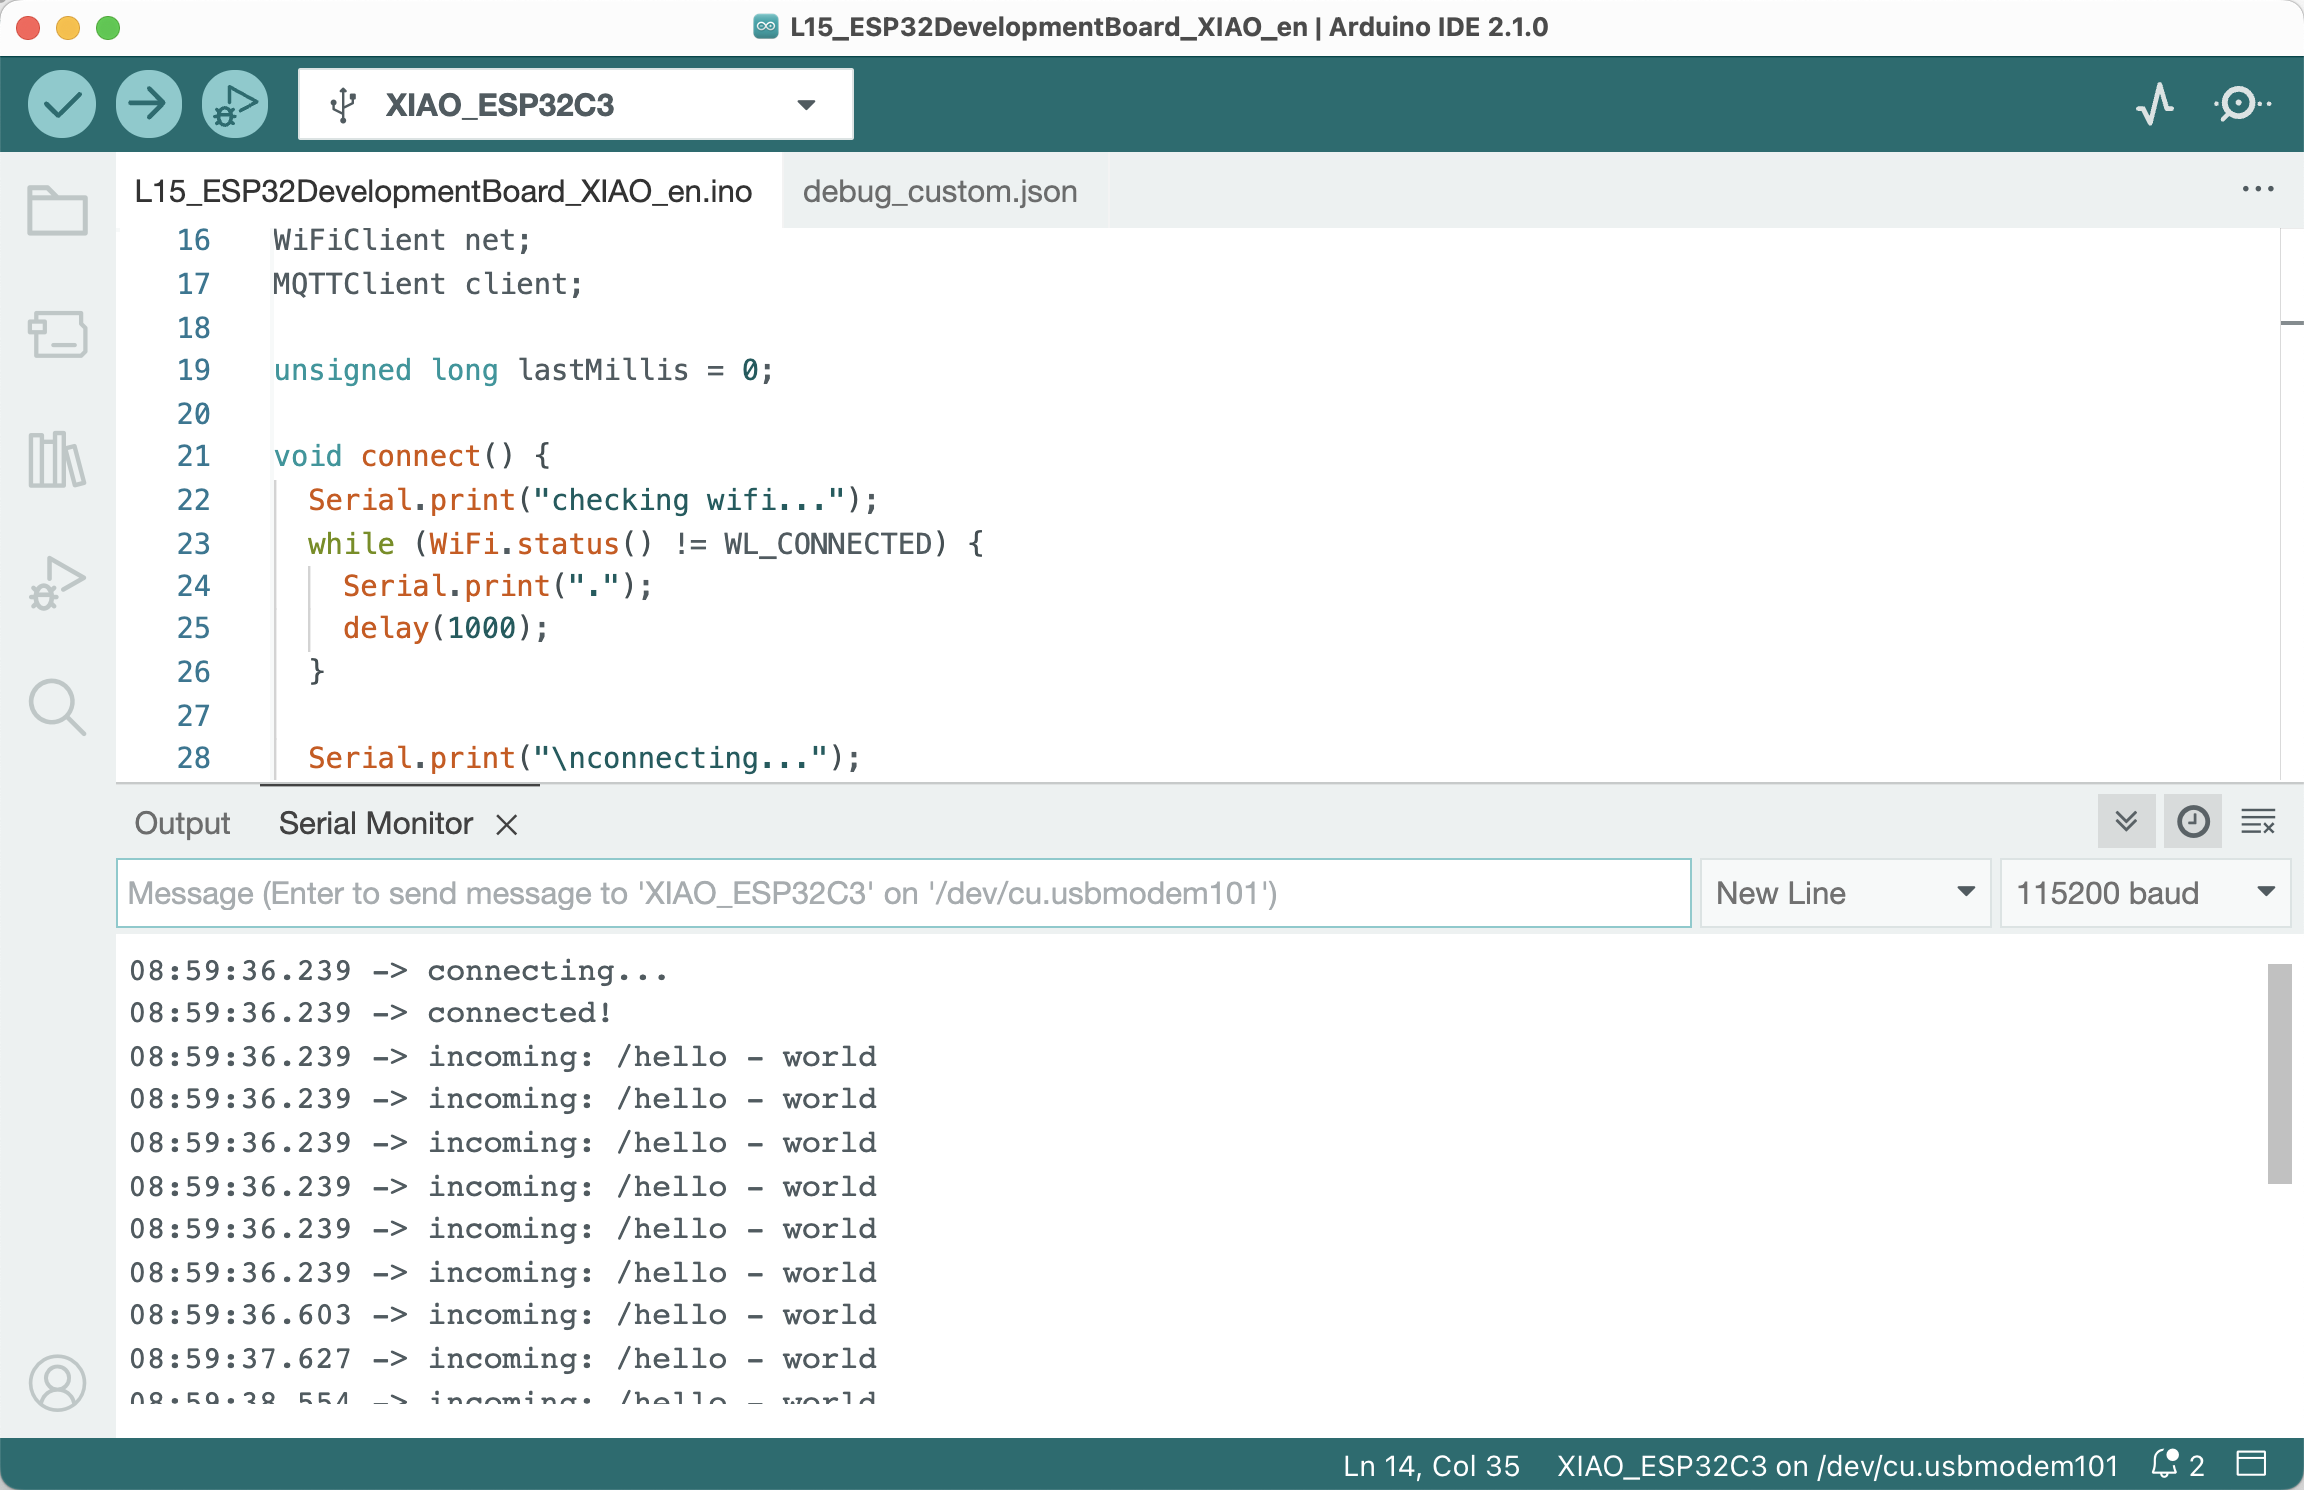
After the example program is opened, you can see the program as shown below. Then change the ssid in the code to your Wi-Fi network name, and change the pass in the code to the corresponding Wi-Fi password for your Wi-Fi network.
// This example uses an ESP32 Development Board
// to connect to shiftr.io.
//
// You can check on your device after a successful
// connection here: https://www.shiftr.io/try.
//
// by Joël Gähwiler
// https://github.com/256dpi/arduino-mqtt

#include <WiFi.h>
#include <MQTT.h>

const char ssid[] = "ssid";
const char pass[] = "pass";

WiFiClient net;
MQTTClient client;

unsigned long lastMillis = 0;

void connect() {
  Serial.print("checking wifi...");
  while (WiFi.status() != WL_CONNECTED) {
    Serial.print(".");
    delay(1000);
  }

  Serial.print("\nconnecting...");
  while (!client.connect("arduino", "public", "public")) {
    Serial.print(".");
    delay(1000);
  }

  Serial.println("\nconnected!");

  client.subscribe("/hello");
  // client.unsubscribe("/hello");
}

void messageReceived(String &topic, String &payload) {
  Serial.println("incoming: " + topic + " - " + payload);

  // Note: Do not use the client in the callback to publish, subscribe or
  // unsubscribe as it may cause deadlocks when other things arrive while
  // sending and receiving acknowledgments. Instead, change a global variable,
  // or push to a queue and handle it in the loop after calling `client.loop()`.
}

void setup() {
  Serial.begin(115200);
  WiFi.begin(ssid, pass);

  // Note: Local domain names (e.g. "Computer.local" on OSX) are not supported
  // by Arduino. You need to set the IP address directly.
  client.begin("public.cloud.shiftr.io", net);
  client.onMessage(messageReceived);

  connect();
}

void loop() {
  client.loop();
  delay(10);  // <- fixes some issues with WiFi stability

  if (!client.connected()) {
    connect();
  }

  // publish a message roughly every second.
  if (millis() - lastMillis > 1000) {
    lastMillis = millis();
    client.publish("/hello", "world");
  }
}
Get this program from Github
https://github.com/mouseart/XIAO-Mastering-Arduino-and-TinyML/tree/main/code/L15_ESP32DevelopmentBoard_XIAO_en
Run the example and check the serial monitor for: connected!. If you see a connected client and flowing messages in the live chart, your XIAO is continuously sending data to this public MQTT broker!
You can see the messages you sent by accessing public.cloud.shiftr.io in your browser. However, because this is a public broker, your device will quickly get lost in the crowd.
💁 Keep in mind, this test broker is public and insecure. Anyone can listen to what you’re publishing, so it should not be used for anything requiring confidentiality.
3.5.3 Deep Dive into MQTT
Topics can have a hierarchy, and clients can use wildcards to subscribe to different levels of different hierarchies. For example: you can send temperature telemetry to the /telemetry/temperature topic, humidity data to the /telemetry/humidity topic, and then subscribe to the /telemetry/* topic in your cloud application to receive both temperature and humidity telemetry. When messages are sent, a Quality of Service (QoS) can be specified which determines the guarantee of message delivery.
- At most once: The message is sent only once, and no additional steps are taken by the client and the broker to confirm delivery (Fire and Forget).
- At least once: The message is retried by the sender until it receives an acknowledgment (Acknowledged delivery).
- Exactly once: A two-level handshake is performed by the sender and receiver to ensure that only one copy of the message is received (Assured delivery).
✅ In what scenarios might you need to deliver messages on a Fire and Forget basis?
Although MQTT (Message Queuing Telemetry Transport) has “Message Queuing” in its name (the first two letters of MQTT), it does not actually support message queues. This means that if a client disconnects and then reconnects, it will not receive messages that were sent while it was disconnected, except for those messages that it had already begun processing using the QoS process. A retain flag can be set on a message. If this flag is set, the MQTT broker will store the last message sent on a topic with this flag, and will send it to any clients who subsequently subscribe to that topic. This way, clients always receive the latest message.
MQTT also supports a keep-alive feature to check if the connection is still online during long intervals between messages.
MQTT connections can be public, or encrypted and protected using usernames, passwords, or certificates.
💁 MQTT communicates over TCP/IP, the same underlying network protocol as HTTP, but on a different port. You can also communicate with web applications running in a browser over MQTT on websockets, or in situations where firewalls or other network rules block standard MQTT connections.
3.5.4 Telemetry
The word “telemetry” comes from Greek roots meaning “remote measurement”. Telemetry refers to the act of collecting data from sensors and sending it to the cloud.
💁 One of the earliest telemetry devices was invented in France in 1874, sending real-time weather and snow depth data from Mont Blanc to Paris. As there was no wireless technology at the time, it used a physical wire.
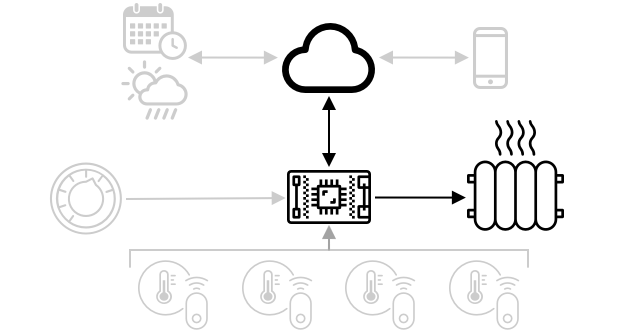
Let’s go back to the smart thermostat example from Section 1.1.
Smart Thermostat System Architecture
The thermostat has temperature sensors to collect telemetry data. It likely has a built-in temperature sensor and may connect to multiple external temperature sensors via wireless protocols such as Low Energy Bluetooth (BLE).
An example of the telemetry data it sends could be:
| Name | Value | Description |
|---|---|---|
| AC_Temperature | 18°C | The temperature measured by the thermostat’s built-in temperature sensor |
| Living_Room_Temperature | 19°C | The temperature measured by a remote temperature sensor named livingroom , indicating the room it is in |
| Bedroom_Temperature | 21°C | The temperature measured by a remote temperature sensor named bedroom , indicating the room it is in |
Then, the cloud service can use this telemetry data to decide what commands to send to control cooling or heating.
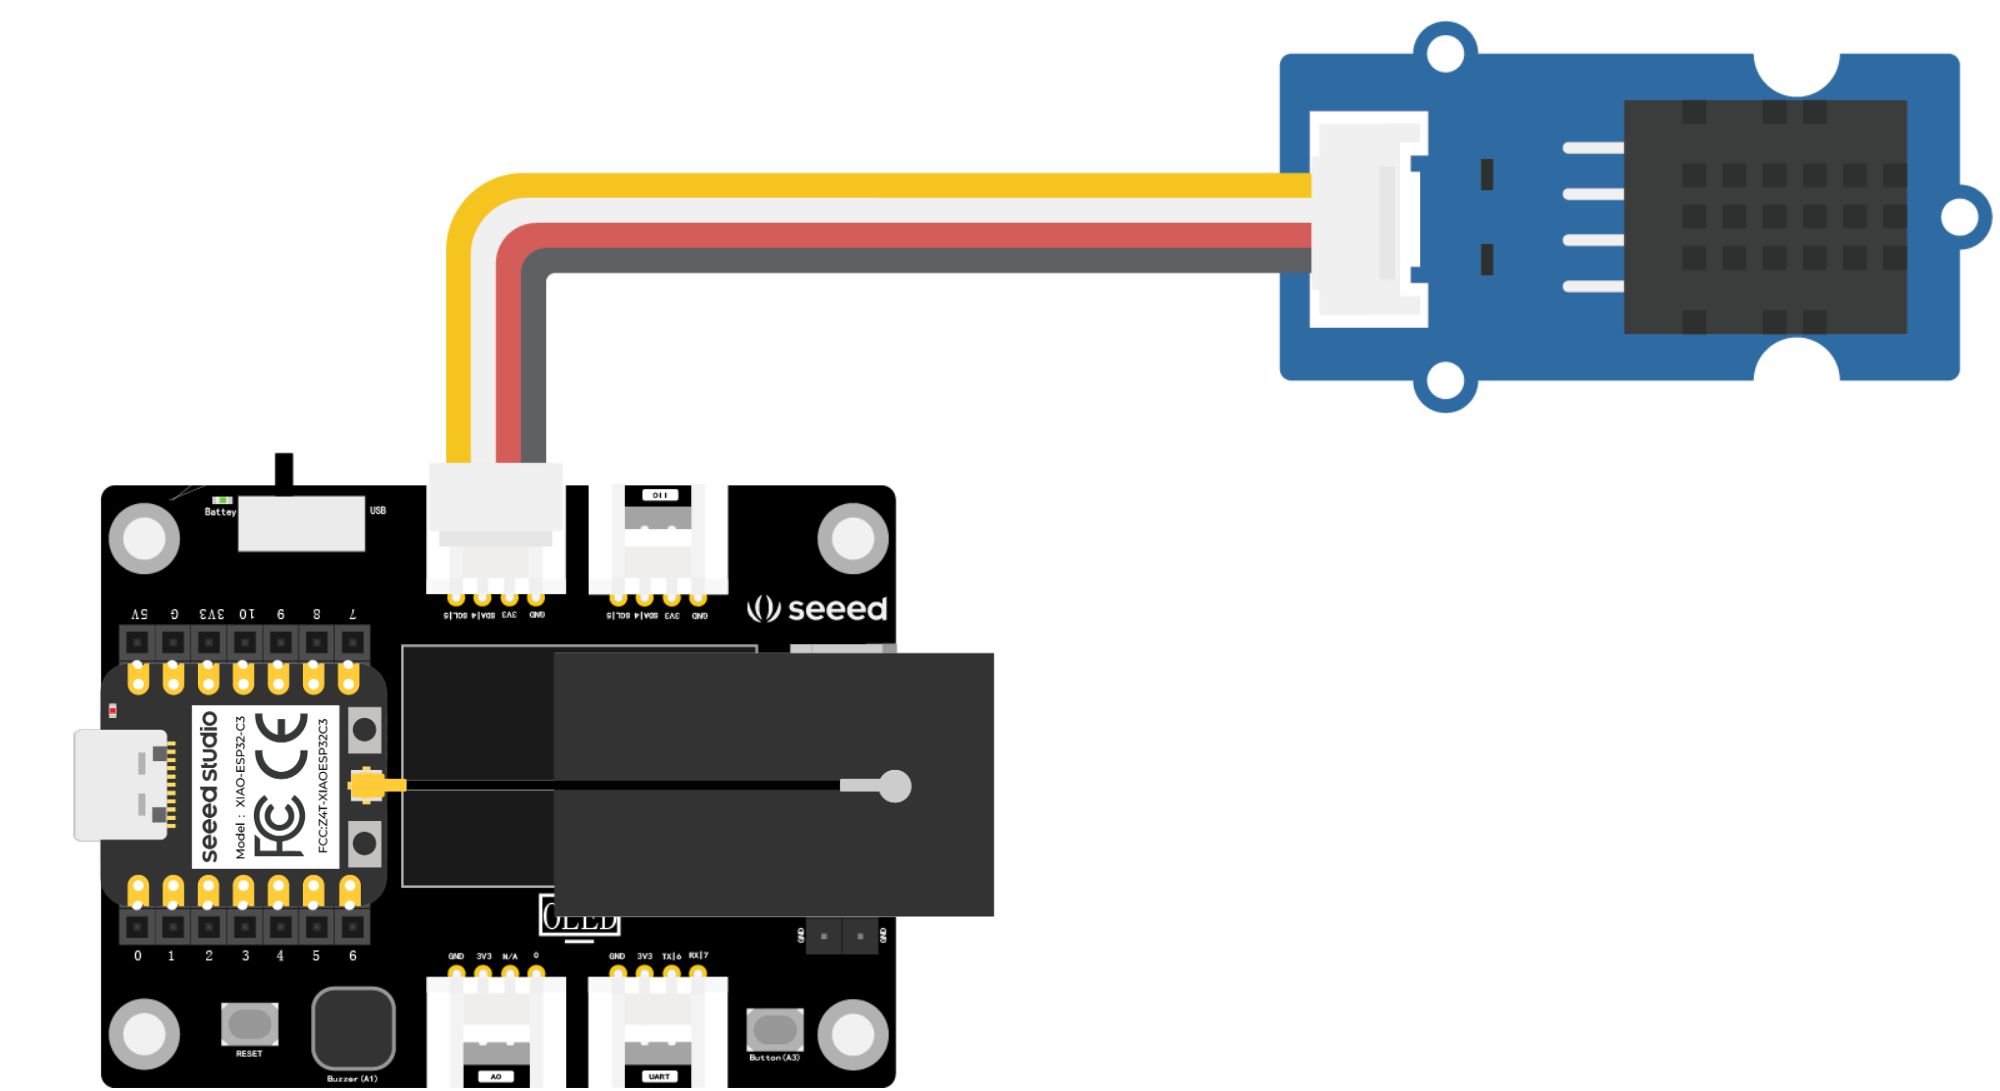
3.5.5 Task 2: Sending Telemetry Information from XIAO to MQTT Broker
The next part of adding internet control to your smart hygrothermograph is sending the temperature and humidity telemetry data to the telemetry topic of the MQTT broker. Replace the XIAO of your smart hygrothermograph device from Section 2.2 with the XIAO ESP32C3, as shown in the image below.
Load the following program into the Arduino IDE to test sending telemetry data from your device to the MQTT broker. Note that in this example, we’re trying a different MQTT broker than in Task 1: broker.hivemq.com, and we’ve set XIAO_ESP32C3_Telemetry/ as the subscription name.
////////////////////////////////////////////////////////////////////////////////
// IDE:
//   Arduino 2.0.0
// Platform:
//   esp32 2.0.5 - https://github.com/espressif/arduino-esp32
// Board:
//   XIAO_ESP32C3
// Libraries:
//   MQTT 2.5.0 - https://github.com/knolleary/pubsubclient
//   ArduinoJson 6.19.4 - https://github.com/bblanchon/ArduinoJson

////////////////////////////////////////////////////////////////////////////////
// Includes

#include <WiFi.h>
#include <PubSubClient.h>
#include <Wire.h>
#include "DHT.h"
#define DHTTYPE DHT20
DHT dht(DHTTYPE);

const char* ssid = "ssid";
const char* password = "pass";

const char* mqtt_server = "broker.hivemq.com";

WiFiClient espClient;
PubSubClient client(espClient);
long lastMsg = 0;
char msg[50];
int value = 0;

float temperature = 0;
float humidity = 0;

void setup() {
  Serial.begin(115200);
  setup_wifi();
  client.setServer(mqtt_server, 1883);
  Wire.begin();
  dht.begin();
}

void setup_wifi() {
  delay(10);
  // We start by connecting to a WiFi network
  Serial.println();
  Serial.print("Connecting to ");
  Serial.println(ssid);

  WiFi.begin(ssid, password);

  while (WiFi.status() != WL_CONNECTED) {
    delay(500);
    Serial.print(".");
  }

  Serial.println("");
  Serial.println("WiFi connected");
  Serial.println("IP address: ");
  Serial.println(WiFi.localIP());
}

void reconnect() {
  // Loop until we're reconnected
  while (!client.connected()) {
    Serial.print("Attempting MQTT connection...");
    // Attempt to connect
    if (client.connect("XIAO_ESP32")) {
      Serial.println("connected");
      // Subscribe
      client.subscribe("XIAO_ESP32/LEDOUTPUT");
    } else {
      Serial.print("failed, rc=");
      Serial.print(client.state());
      Serial.println(" try again in 5 seconds");
      // Wait 5 seconds before retrying
      delay(5000);
    }
  }
}

void loop() {

  if (!client.connected()) {
    reconnect();
  }
  client.loop();

  long now = millis();
  float temp_hum_val[2] = {0};
  if (now - lastMsg > 5000) {
    lastMsg = now;

    dht.readTempAndHumidity(temp_hum_val);
    temperature = temp_hum_val[1];

    char tempString[8];
    dtostrf(temperature, 1, 2, tempString);
    Serial.print("Temperature: ");
    Serial.println(tempString);
    client.publish("XIAO_ESP32C3_Telemetry/Temperaturedataread", tempString);

    humidity = temp_hum_val[0];

    char humString[8];
    dtostrf(humidity, 1, 2, humString);
    Serial.print("Humidity: ");
    Serial.println(humString);
    client.publish("XIAO_ESP32_Telemetry/Humiditydataread", humString);
  }

}
Get this program from Github
https://github.com/mouseart/XIAO-Mastering-Arduino-and-TinyML/tree/main/code/L15_MQTTTelemetry_XIAO_en
Because this example relies on the PubSubClient.h library, if you try to compile it directly, you will encounter the error “PubSubClient.h: No such file or directory”. To resolve this issue, follow the steps below to install the library.
- Open the Arduino IDE.
- Go to “Sketch” -> “Include Library” -> “Manage Libraries”.
- In the Library Manager, type “PubSubClient” in the search bar.
- Look for the “PubSubClient” library by Nick O’Leary and click on it.
- Click the “Install” button to install the library.
Then modify the ssid in the code to your Wi-Fi network name and pass to your Wi-Fi password corresponding to your Wi-Fi network name.
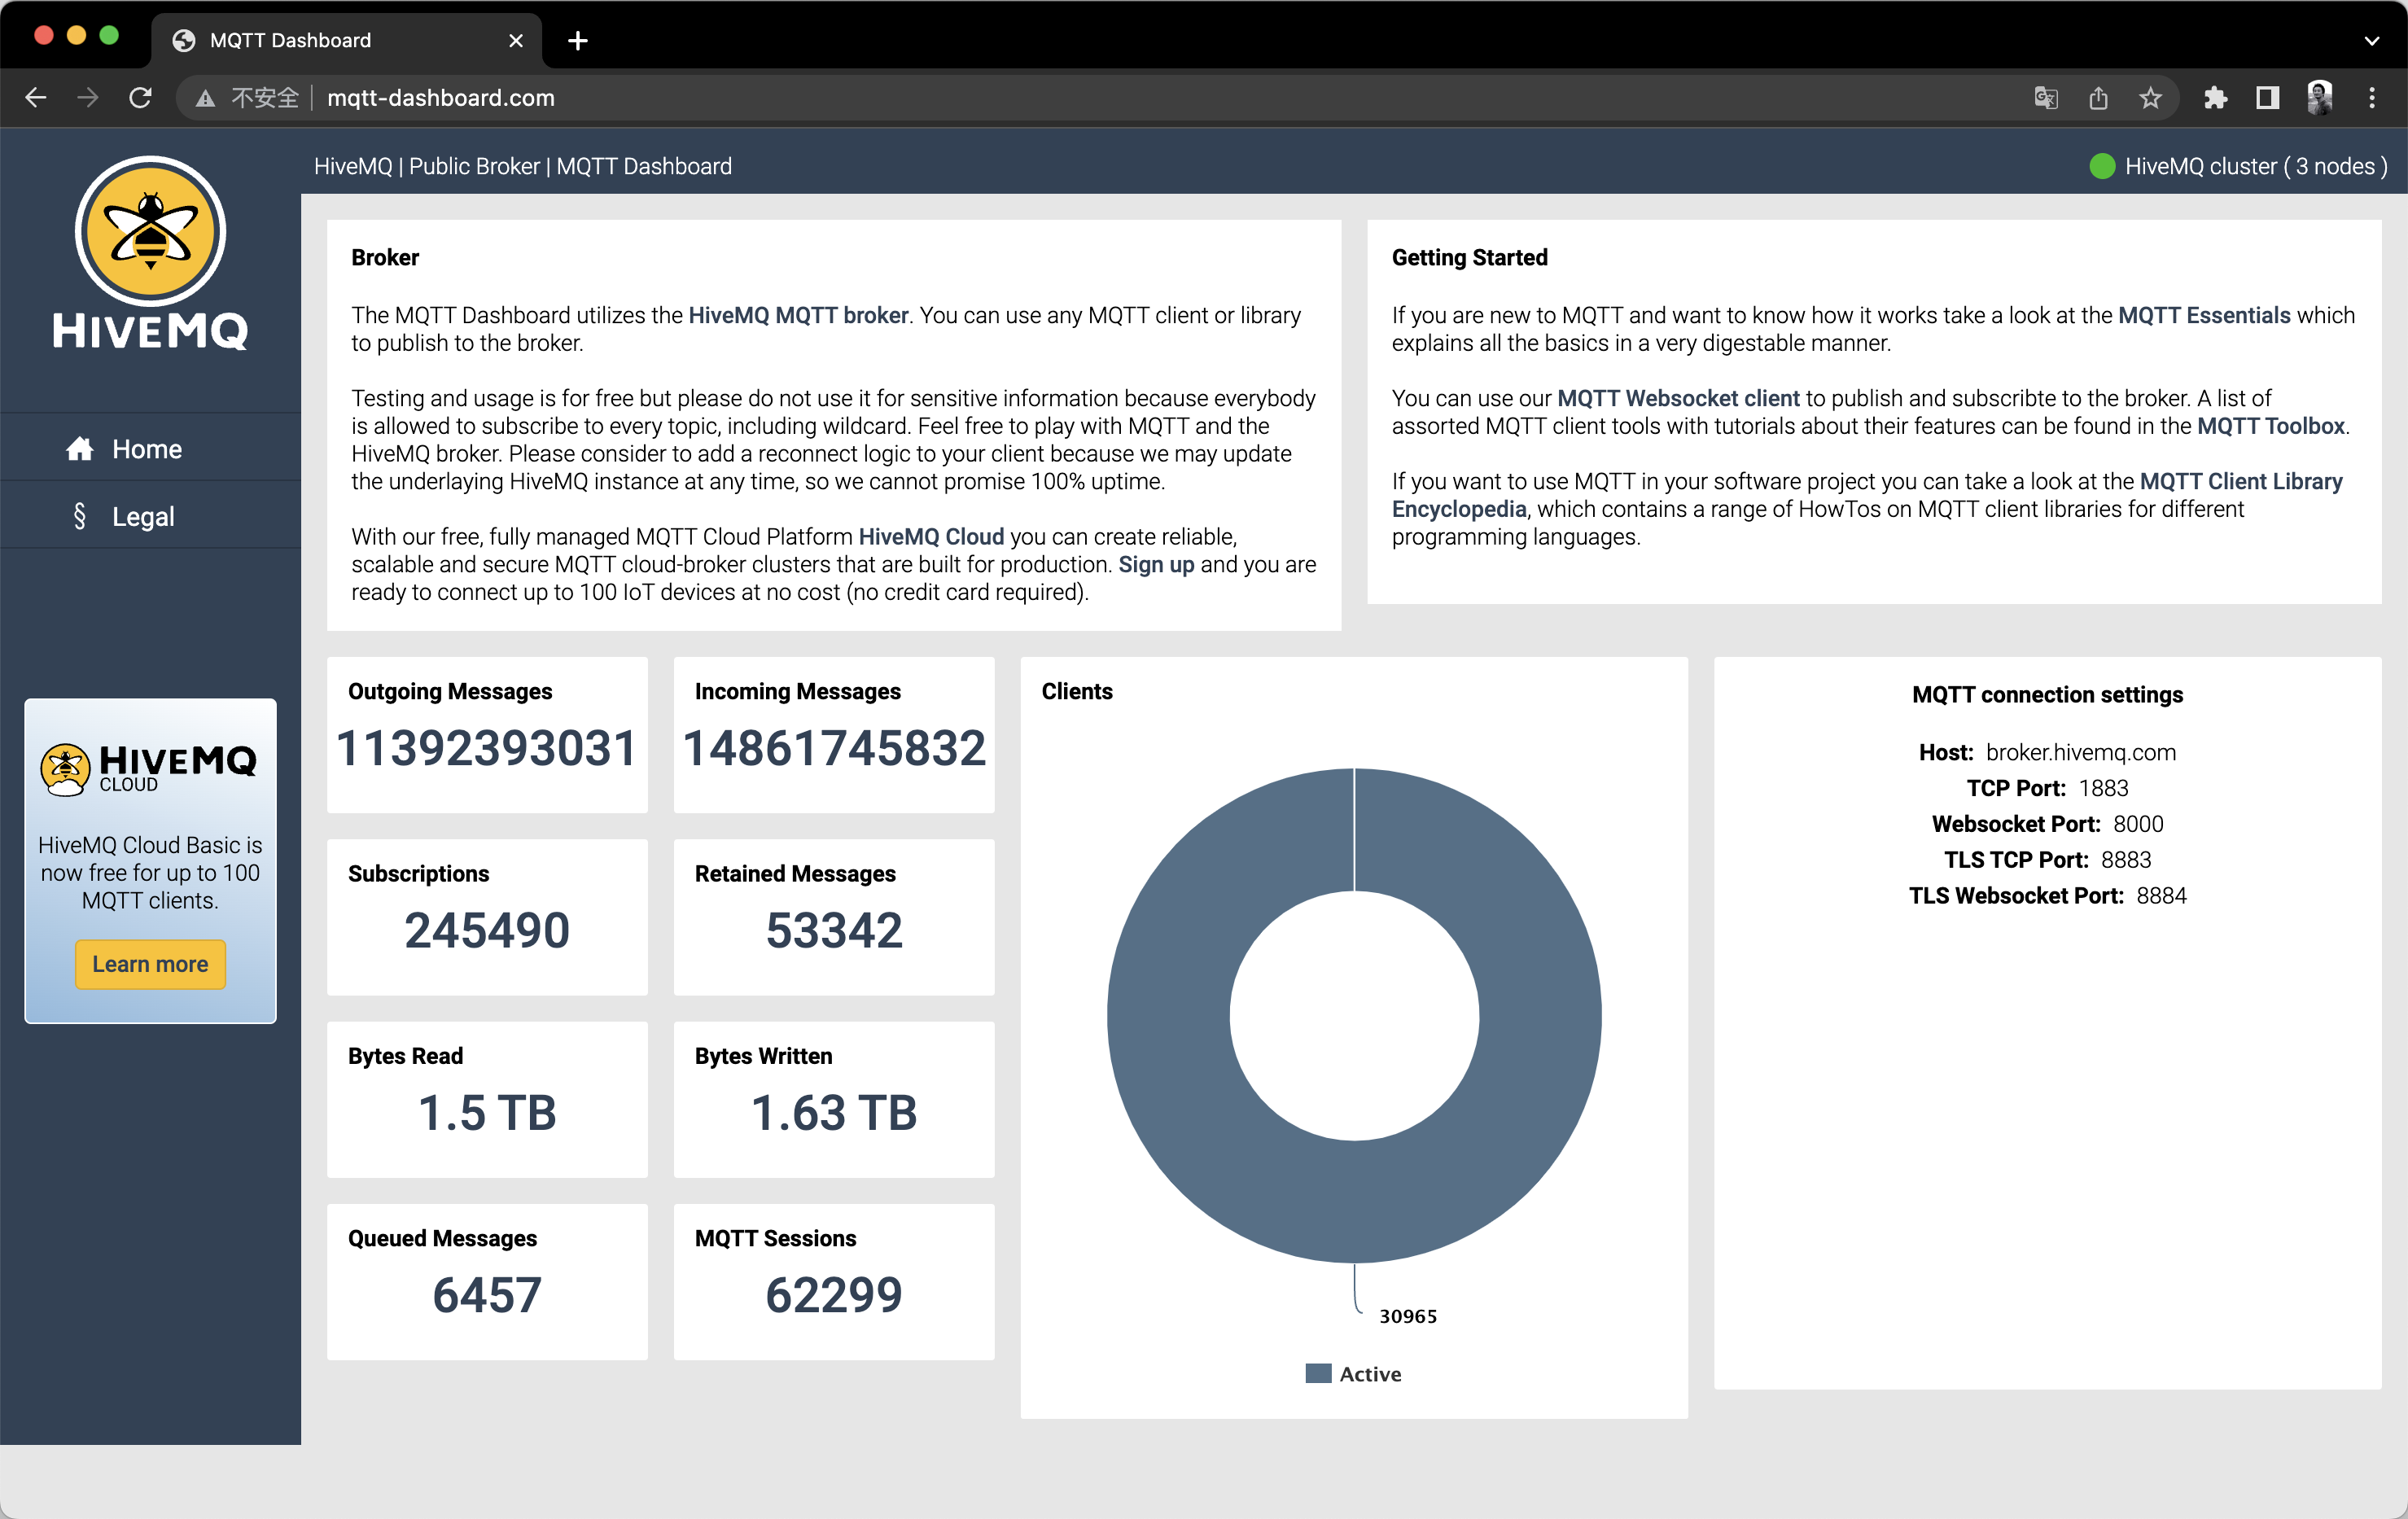
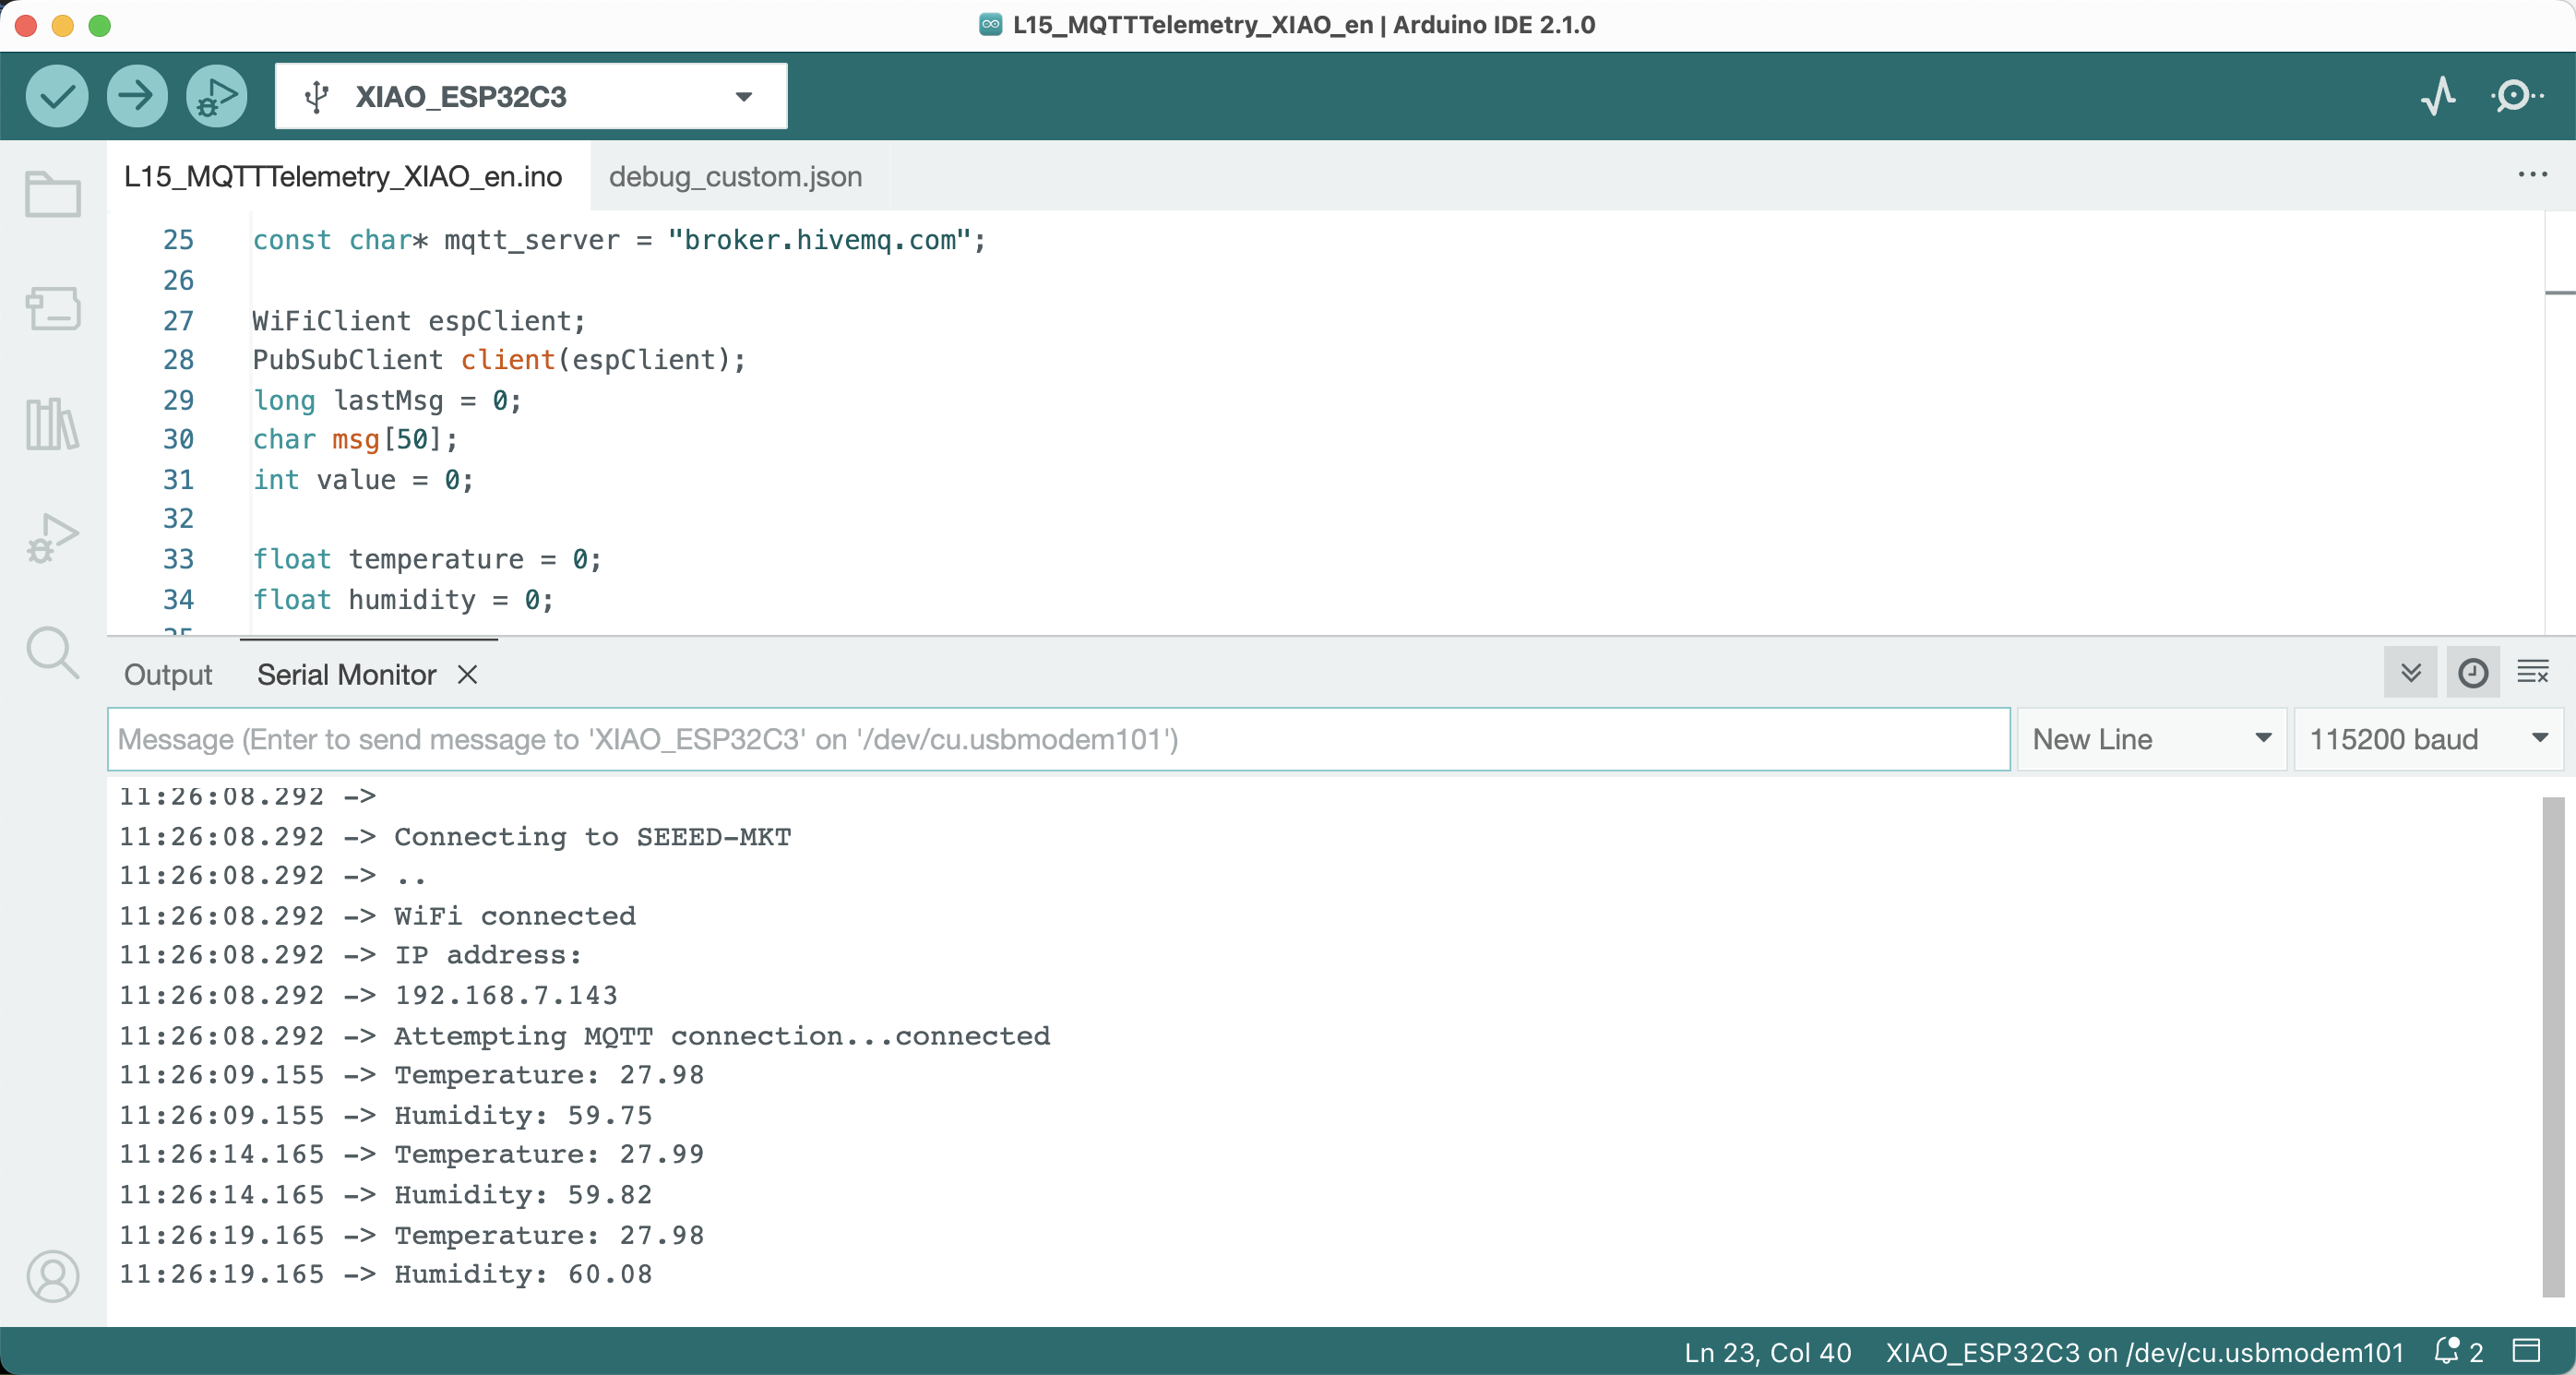
After successfully uploading the program, open the serial monitor. If all goes well, you will see the device start sending temperature and humidity data, as shown in the image below.
How can you see the sensor data from another platform? There are many ways, such as MQTT X. After downloading and installing the software suitable for your PC system, the interface is as shown in the image below.

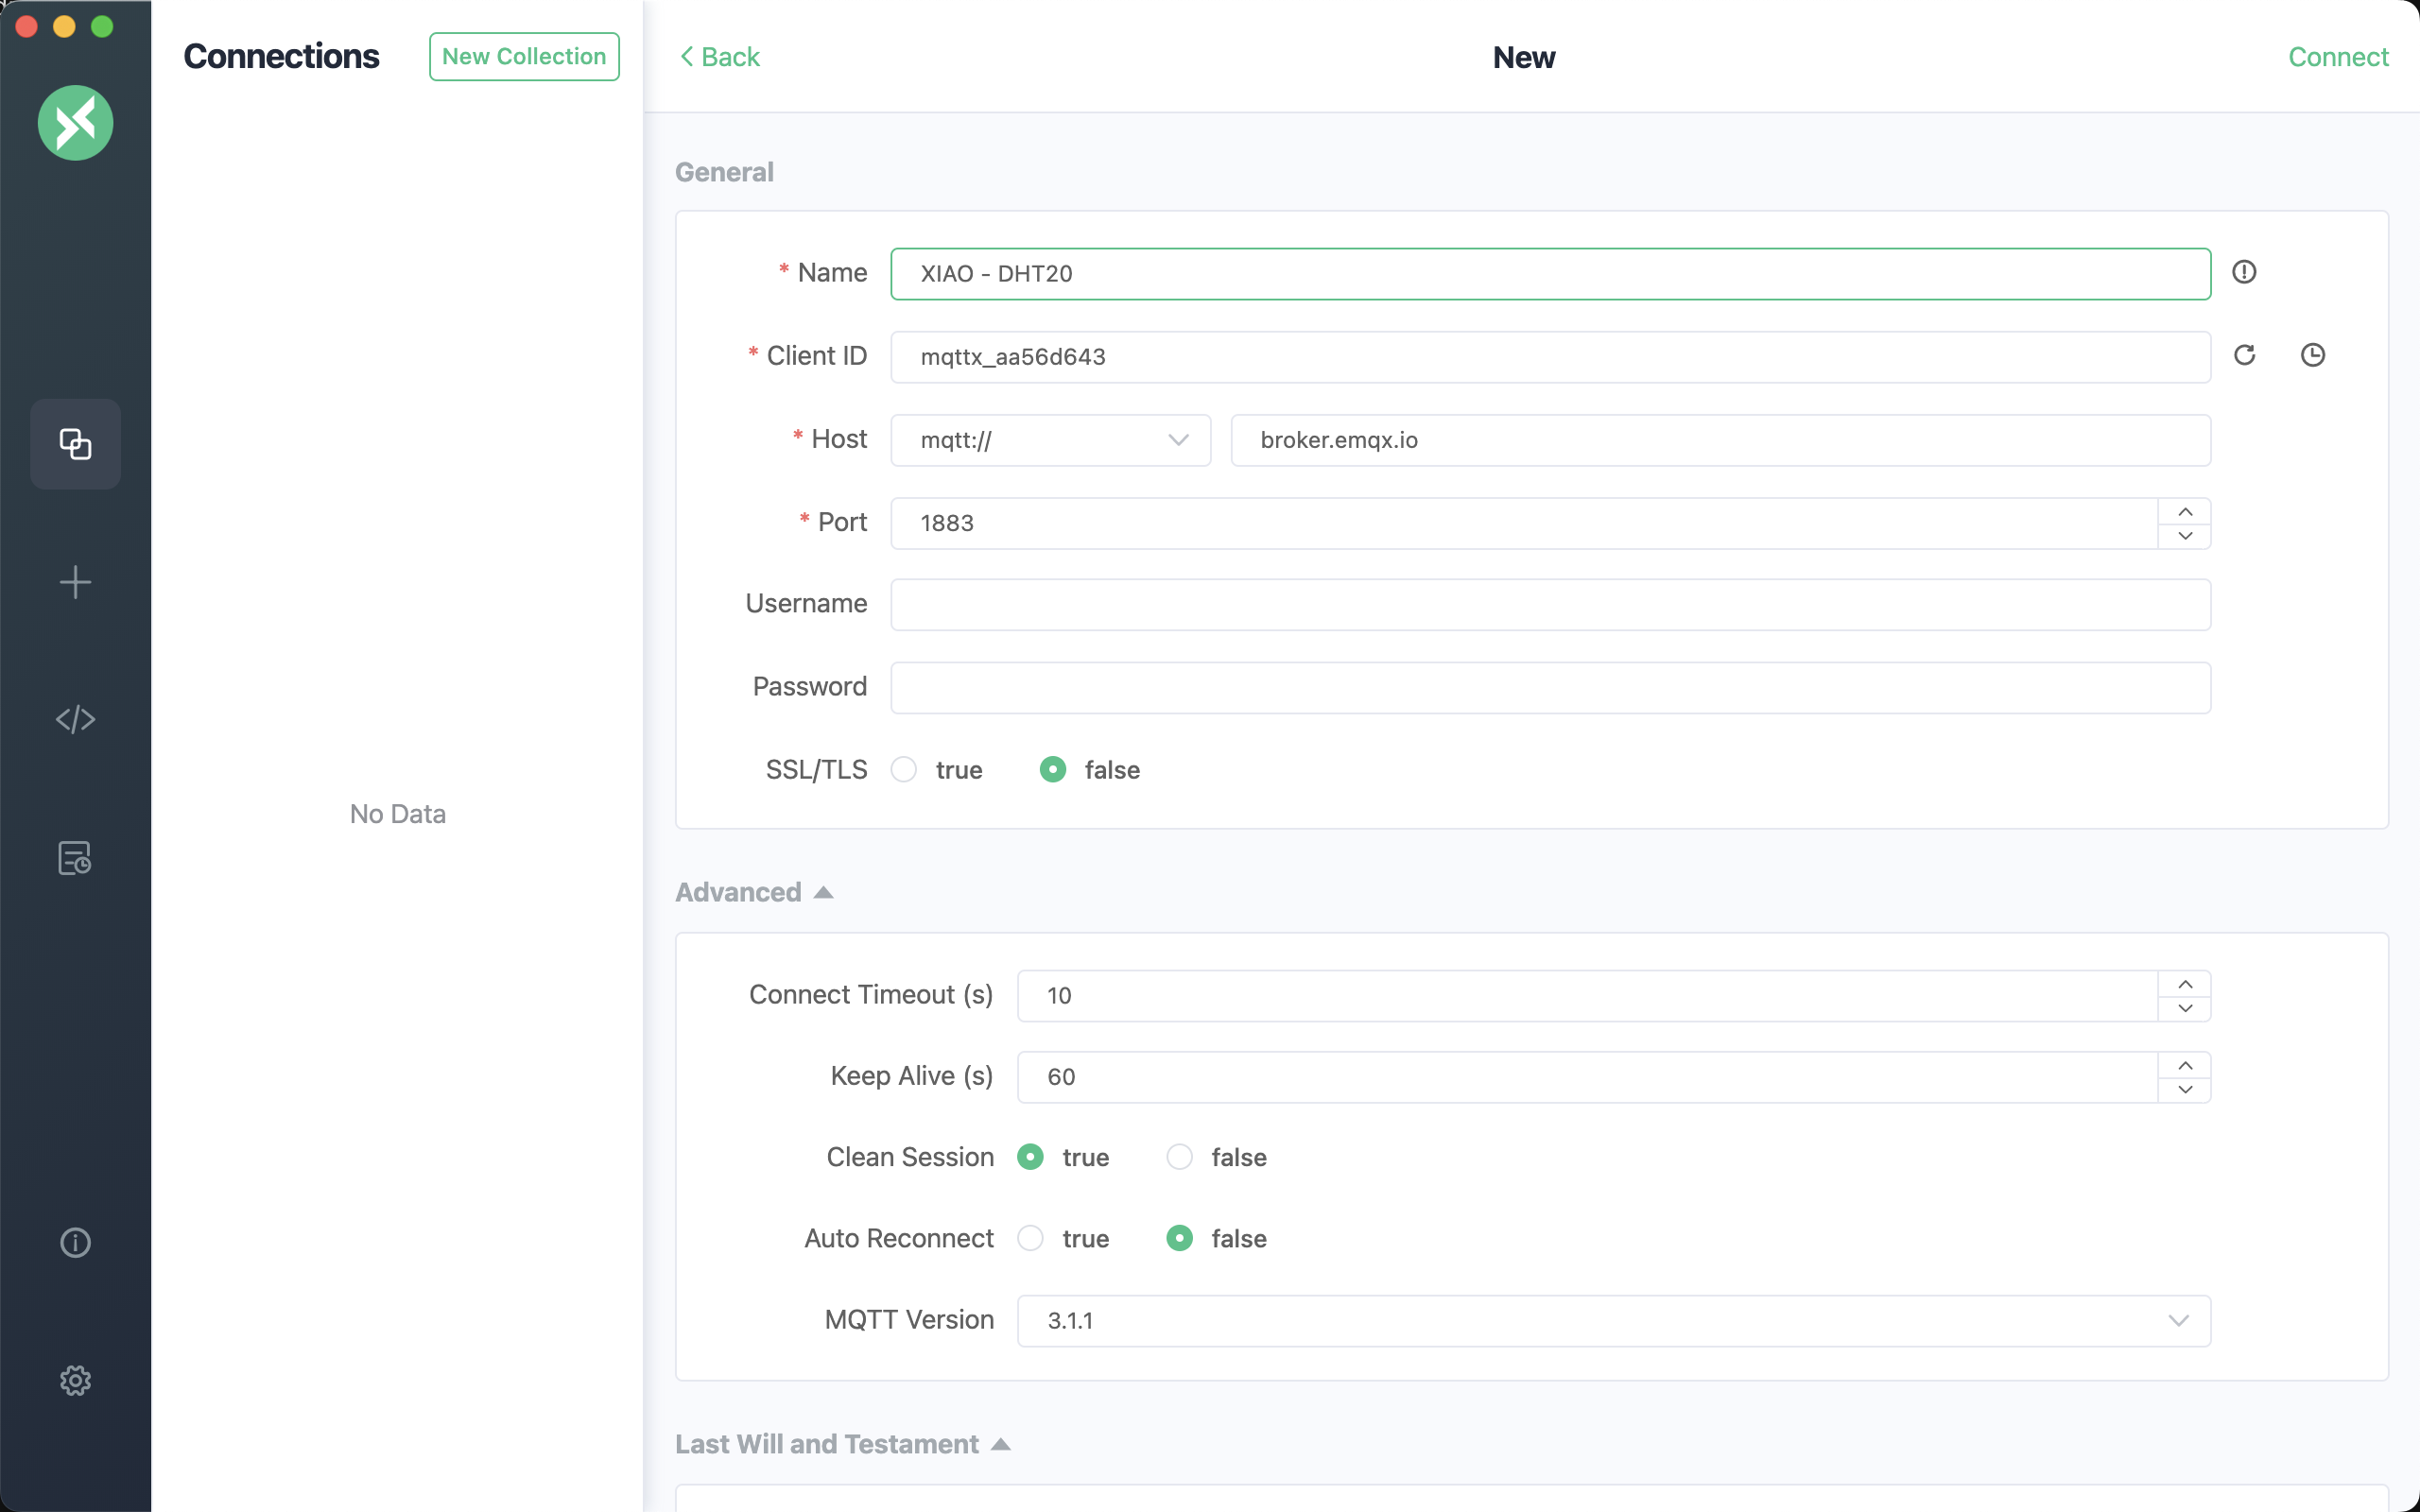
Clicking the + New Connection button will bring you to the connection creation window, as shown in the image below. Fill in XIAO-DHT20 in the Name box as the connection name. The Host is broker.hivemq.com that we set in the program, no other settings are needed, click Connect in the upper right corner.
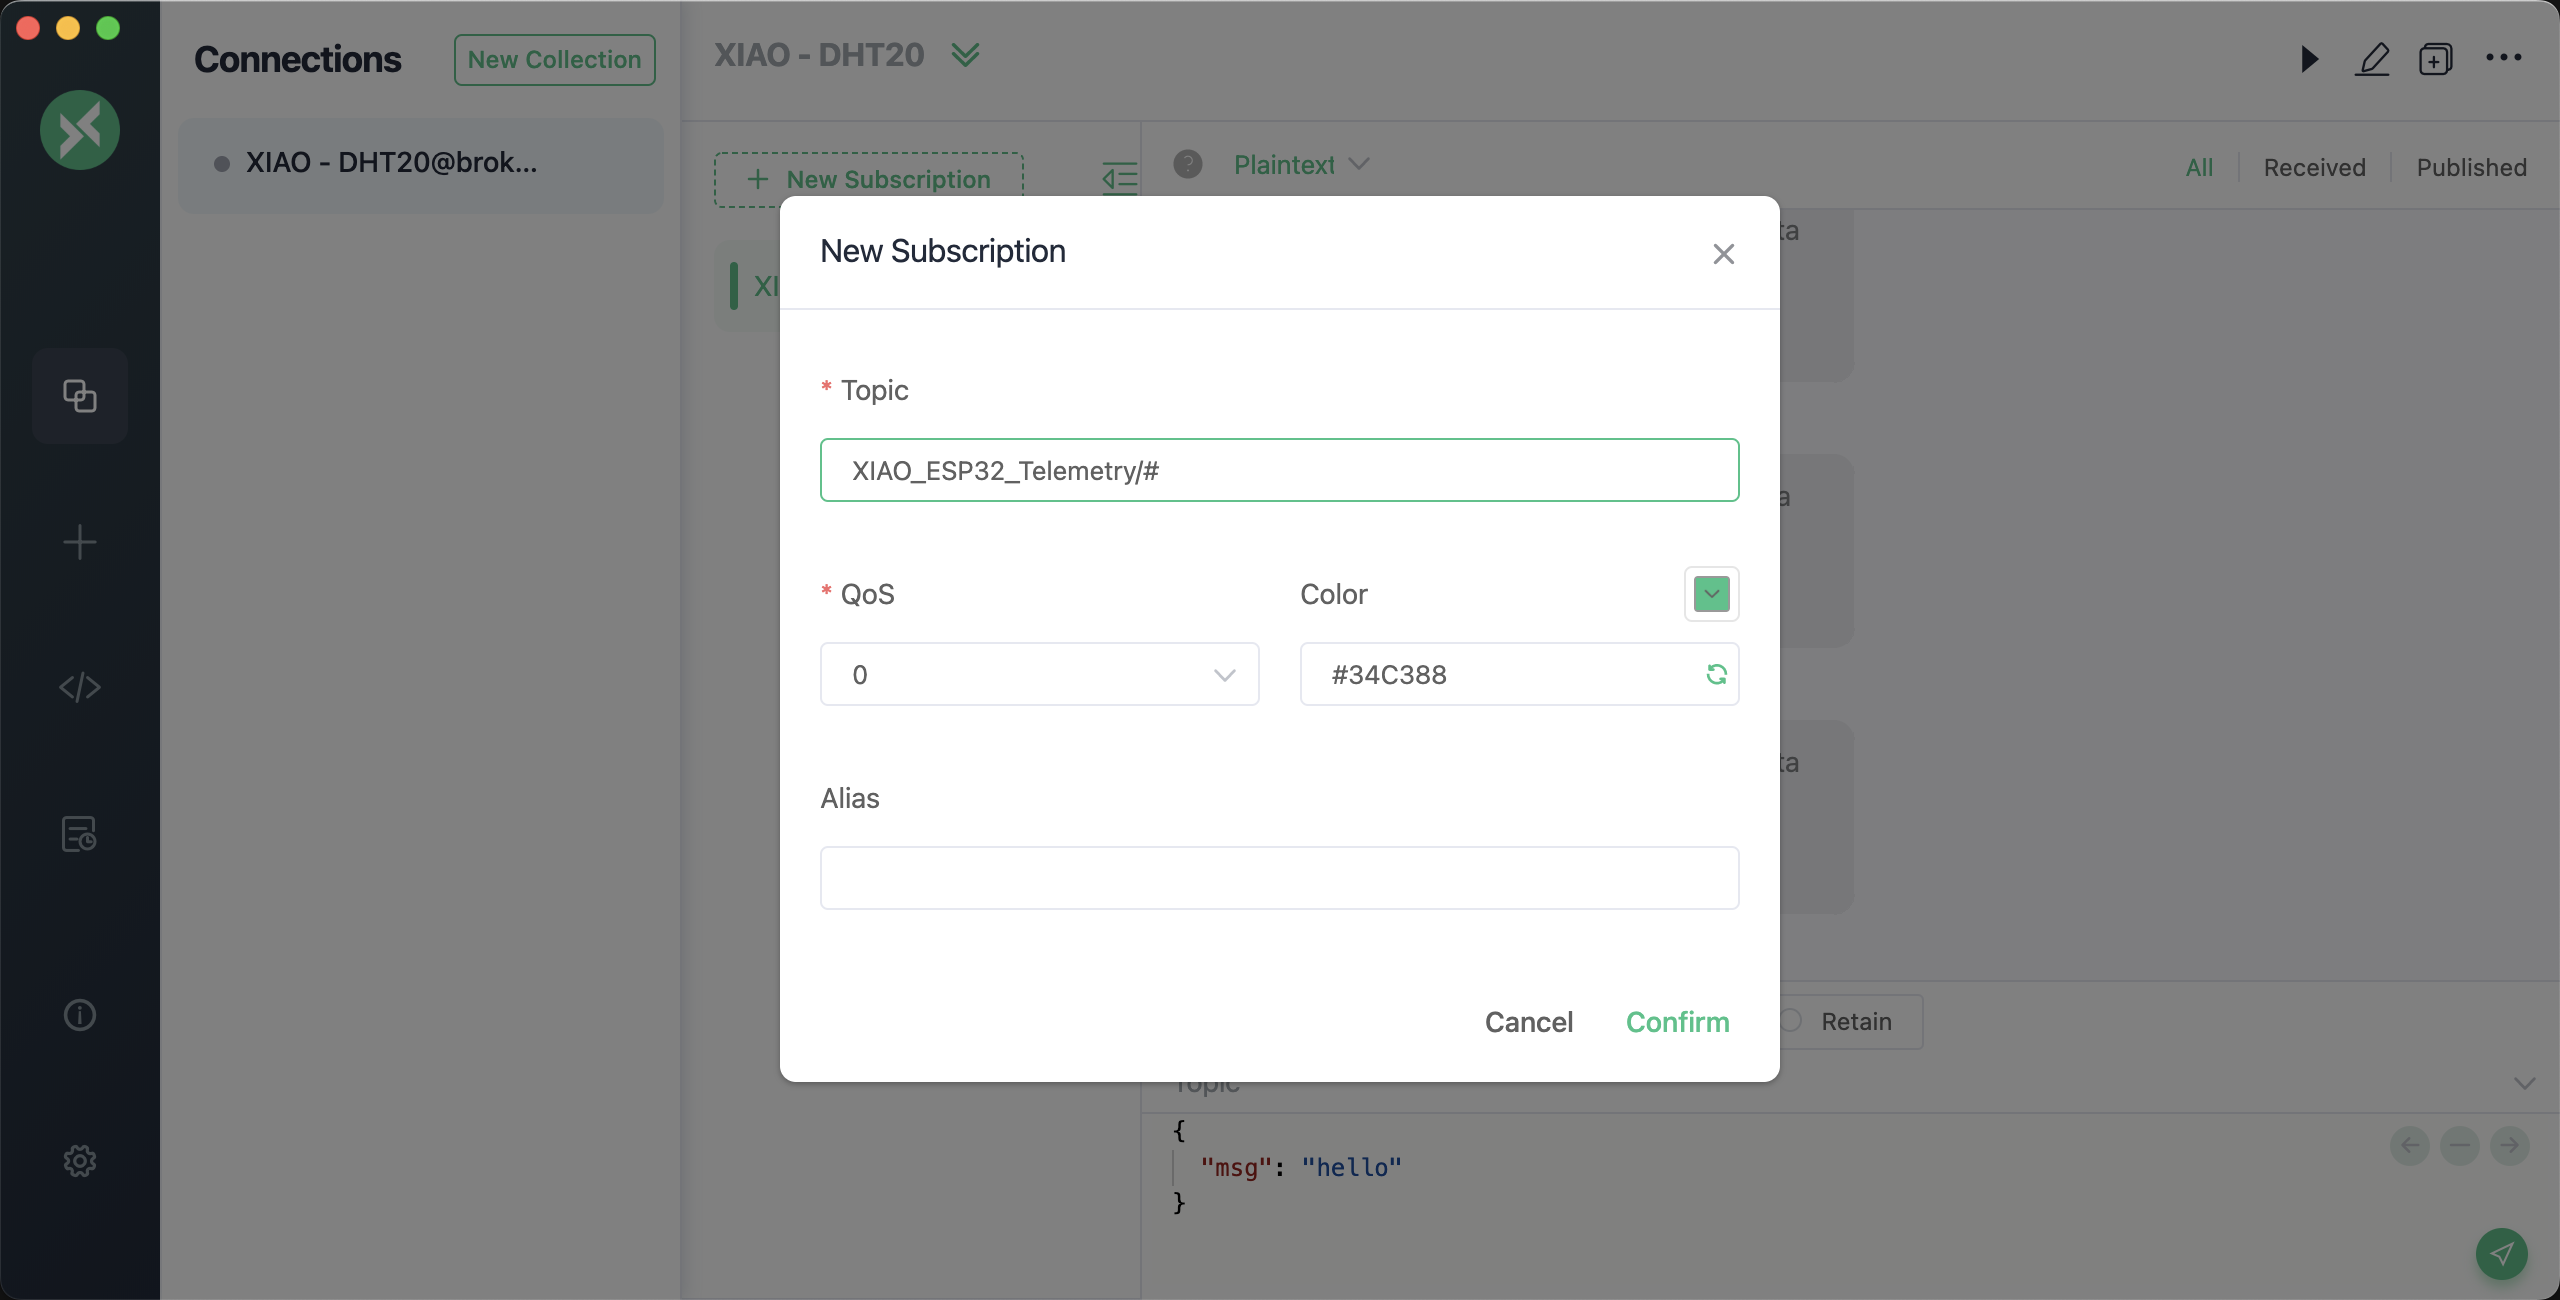
Create a new subscription, showing all the information under XIAO_ESP32C3_Telemetry/, as shown in the image below.
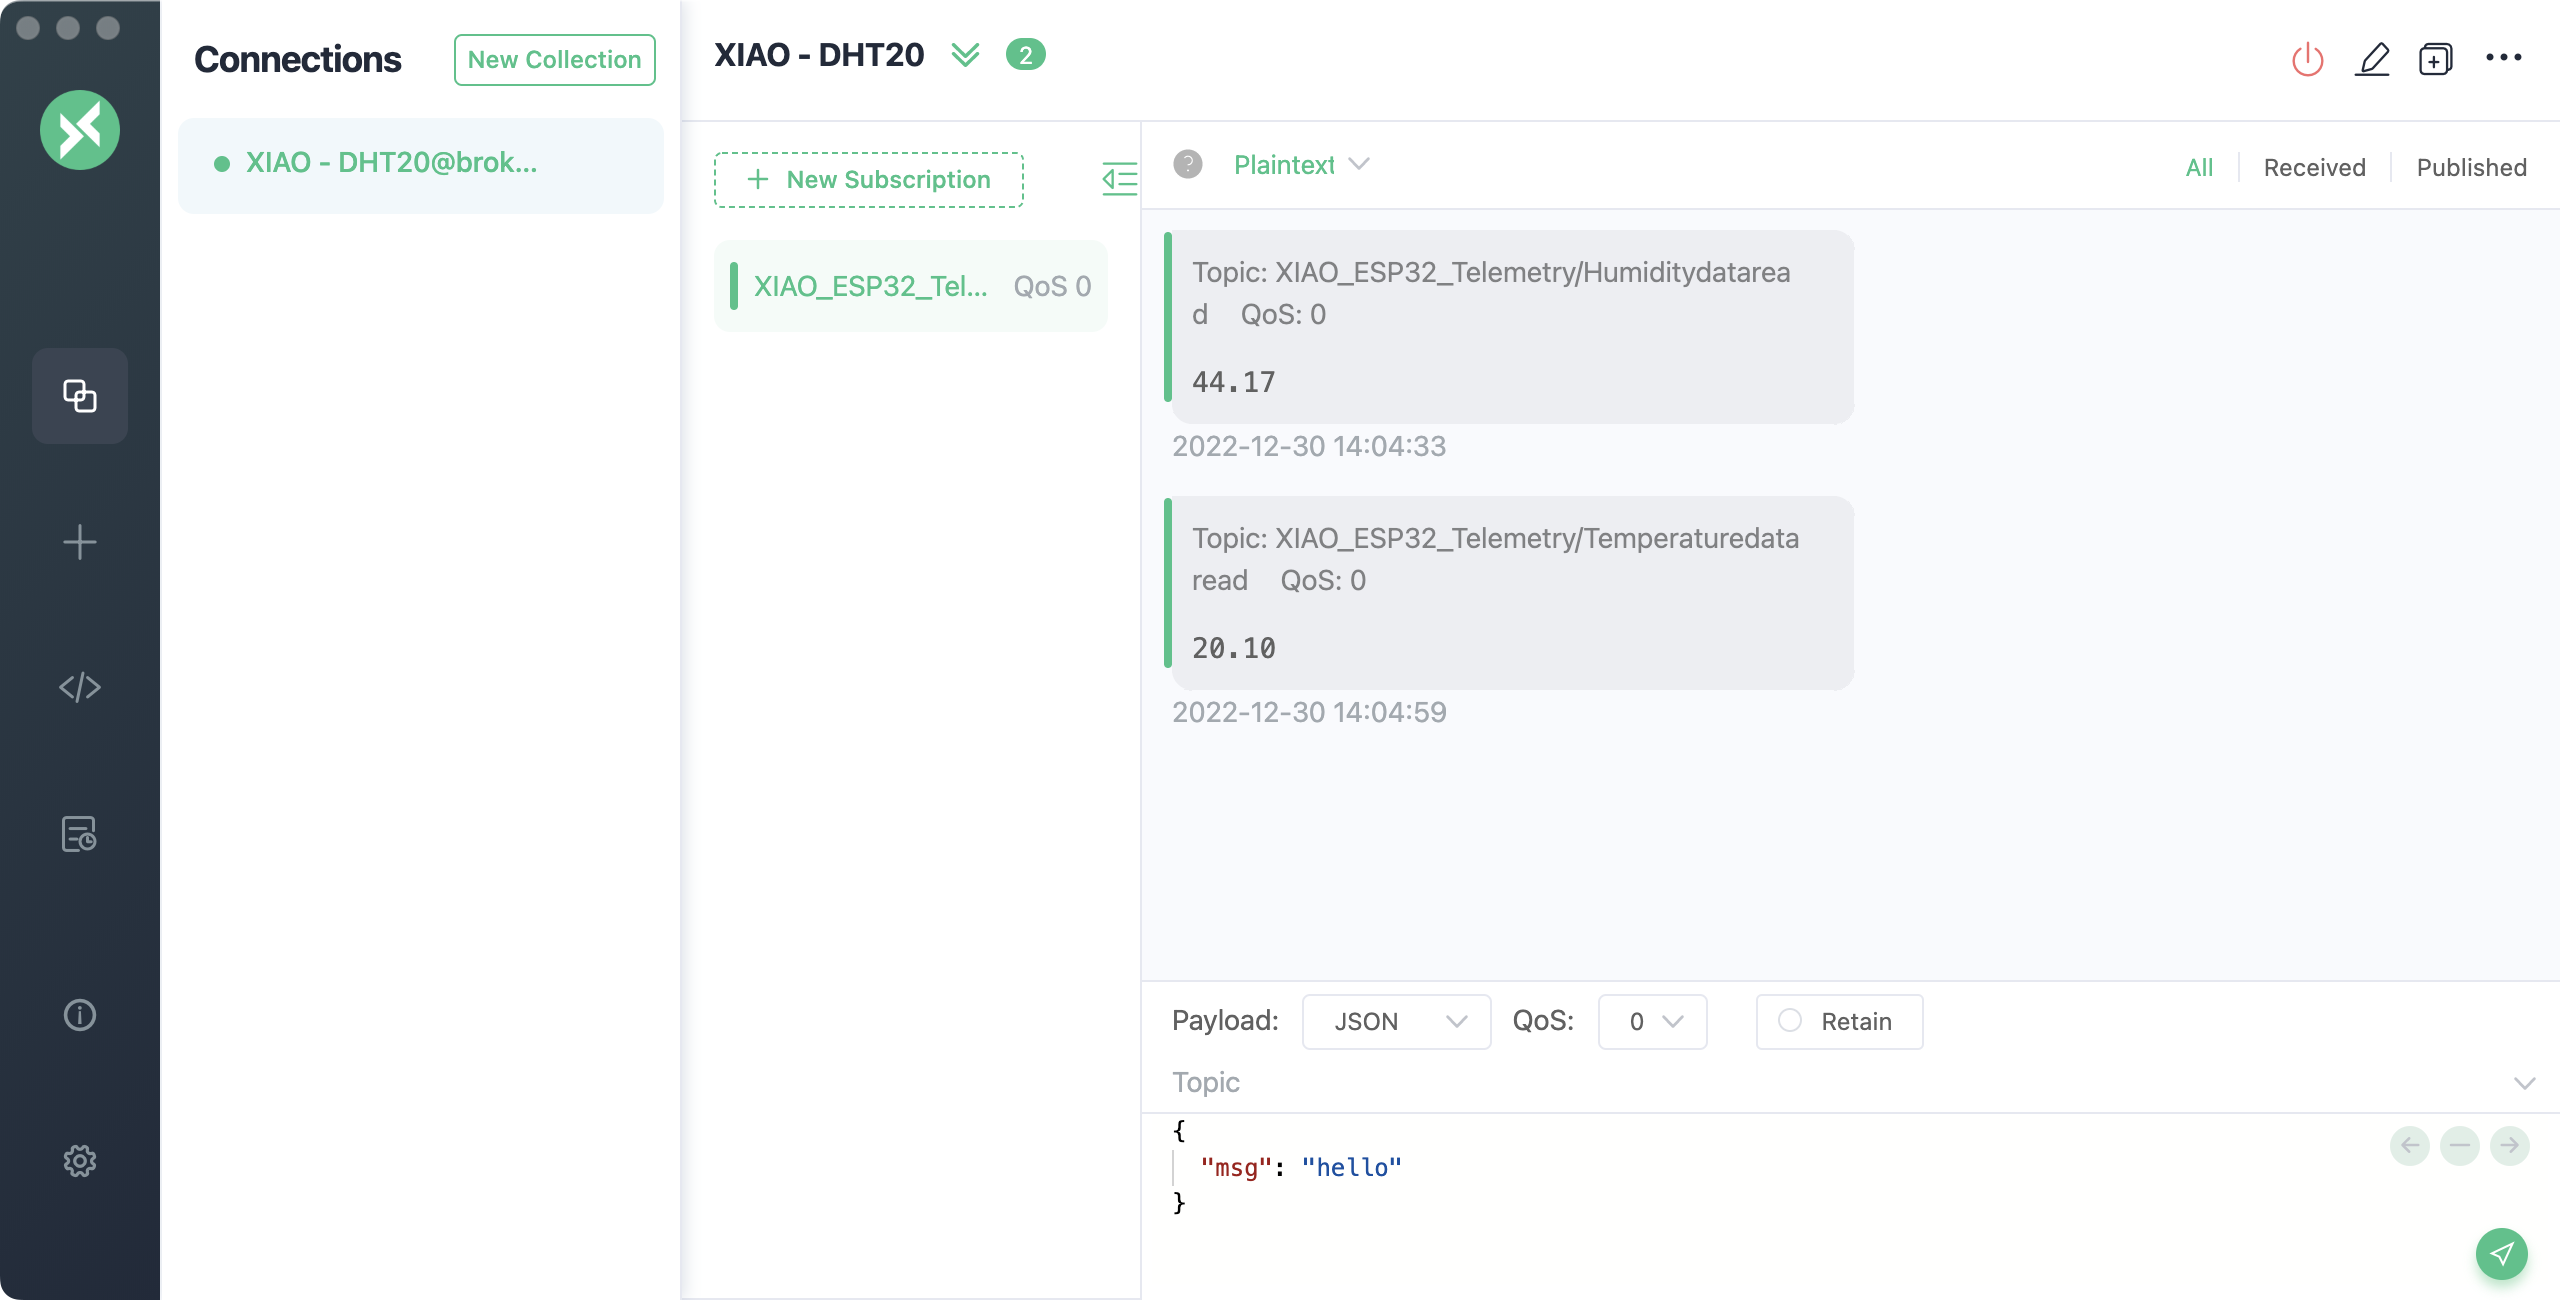
Now, we can see the telemetry data sent from XIAO ESP32C3, as shown in the image below.
How often should telemetry be sent?
One question that needs careful consideration with telemetry is: how often should you measure and send data? The answer is — it depends on the needs of the device being monitored and the task at hand. If you measure frequently, you can indeed respond to changes in the measurements more quickly, but this would cause your device to consume more power, more bandwidth, generate more data, and require more cloud resources to handle. You need to strike a balance between measuring often enough but not too often.
For a thermostat, measuring every few minutes might be enough because the temperature isn’t likely to change frequently. If you only measure once a day, then you might be heating your house for nighttime temperatures on a sunny day, and if you measure every second, you’d have thousands of unnecessary repeated temperature measurements which will eat up users’ internet speed and bandwidth (which is a problem for people with limited bandwidth plans), and also consume more power, which is a problem for devices like remote sensors that rely on battery power, and further increase the cost of cloud computing resources to process and store them.
If you’re monitoring data around a machine in a factory that might cause catastrophic damage and millions in lost revenue if it fails, then measuring multiple times a second may be necessary. Wasting bandwidth is better than missing telemetry data that could signal the need to stop and repair before a machine fails.
💁 In this situation, you could consider first using an edge device to handle the telemetry data to reduce dependence on the internet.
Losing connection
Internet connections can be unreliable, and it’s common to lose signal. In this case, what should an IoT device do? Should it lose data, or should it store data until the connection is restored? Again, the answer is — it depends on the device being monitored.
For a thermostat, data is likely lost once a new temperature measurement has been made. If the current temperature is 19°C, the heating system doesn’t care that the temperature 20 minutes ago was 20.5°C; it’s the current temperature that dictates whether the heat should be turned on or off.
For some machines, you may want to retain this data, especially if it’s being used to look for trends. Some machine learning models can identify anomalies in data streams by looking at a defined time period (e.g., the last hour). This is often used for predictive maintenance, looking for signs that something might be about to fail so you can repair or replace it before disaster strikes. You may want every point of telemetry from a machine sent so it can be used for anomaly detection, so once an IoT device can reconnect, it will send all the telemetry data generated during the internet outage.
IoT device designers should also consider whether an IoT device can operate during an internet outage or if it loses signal due to location. If a smart thermostat is unable to send telemetry data to the cloud due to an internet outage, it should be able to make some limited decisions to control heating.

This Ferrari became a brick when someone tried to update it in an underground car park… but there was no cell signal there.
For MQTT handling connection interruptions, if necessary, the device and server code will need to be responsible for ensuring message delivery, for example, requiring all sent messages to be replied to by an additional message on the reply topic, and if not, to manually queue them for later resending.
3.5.6 Commands
Commands are messages sent by the cloud to a device instructing it to do something. Most often, this involves providing some output via an actuator, but it could be an instruction to the device itself, such as to reboot, or to collect additional telemetry data and send it as a response to the command.
A thermostat could receive a command from the cloud to turn on the heat. Based on the telemetry data from all sensors, if the cloud service has decided that the heat should be turned on, then it sends the appropriate command.
3.5.7 Task 3: Send Commands to XIAO via MQTT Broker
Having mastered telemetry, the next step is to send commands to IoT devices via an MQTT broker. In this task, we will try to use a computer with MQTT broker, often called a host computer, to send specific characters and let the Wi-Fi connected XIAO ESP32C3 control a buzzer attached to an expansion board to emit a warning sound.
In the Arduino IDE, load the following program to test sending specific characters (first character is ‘0’) from the MQTT broker to activate the buzzer. We use the MQTT broker: broker.hivemq.com in this example.
////////////////////////////////////////////////////////////////////////////////
// IDE:
//   Arduino 2.0.0
// Platform:
//   esp32 2.0.5 - https://github.com/espressif/arduino-esp32
// Board:
//   XIAO_ESP32C3
// Libraries:
//   MQTT 2.5.0 - https://github.com/knolleary/pubsubclient
//   ArduinoJson 6.19.4 - https://github.com/bblanchon/ArduinoJson
//  https://github.com/Seeed-Studio/Seeed_Arduino_MultiGas


////////////////////////////////////////////////////////////////////////////////
// Includes


#include <WiFi.h>
#include <PubSubClient.h>
#include <Wire.h>


const char* ssid = "ssid";
const char* password = "pass";


const char* mqtt_server = "broker.hivemq.com";


WiFiClient espClient;
PubSubClient client(espClient);
long lastMsg = 0;
char msg[50];
int value = 0;


int speakerPin = A3;


void setup_wifi() {
  delay(10);
  // We start by connecting to a WiFi network
  Serial.println();
  Serial.print("Connecting to ");
  Serial.println(ssid);


  WiFi.begin(ssid, password);


  while (WiFi.status() != WL_CONNECTED) {
    delay(500);
    Serial.print(".");
  }


  Serial.println("");
  Serial.println("WiFi connected");
  Serial.println("IP address: ");
  Serial.println(WiFi.localIP());
}


void callback(char* topic, byte* payload, unsigned int length) {
  Serial.print("Message arrived [");
  Serial.print(topic);
  Serial.print("] ");
  for (int i=0;i<length;i++) {
    Serial.print((char)payload[i]);
  }
  if((char)payload[0]=='0'){
    Serial.print("  RUN");
    digitalWrite(speakerPin, HIGH);
    delay(2000);
    digitalWrite(speakerPin, LOW);
    delay(100);
  }
  Serial.println();
}


void setup() {
  Serial.begin(115200);
  pinMode(speakerPin, OUTPUT);
  setup_wifi();
  client.setServer(mqtt_server, 1883);
  client.subscribe("XIAO_ESP32/Recieve");
  client.setCallback(callback);
}


void reconnect() {
  // Loop until we're reconnected
  while (!client.connected()) {
    Serial.print("Attempting MQTT connection...");
    // Attempt to connect
    if (client.connect("XIAO_ESP32")) {
      Serial.println("connected");
      // Subscribe

    } else {
      Serial.print("failed, rc=");
      Serial.print(client.state());
      Serial.println(" try again in 5 seconds");
      // Wait 5 seconds before retrying
      delay(5000);
    }
  }
}


void loop() {

  if (!client.connected()) {
    reconnect();
    client.subscribe("XIAO_ESP32/Recieve");
  }
  client.loop();


}
Get this program from Github
https://github.com/mouseart/XIAO-Mastering-Arduino-and-TinyML/tree/main/code/L15_MQTTCommand_XIAO_en
Then modify the ssid in the code to your Wi-Fi network name, and modify the pass in the code to the Wi-Fi password corresponding to your Wi-Fi network name.
The logic of the program execution is explained as follows:
client.setServer(mqtt_server, 1883);
client.subscribe("XIAO_ESP32/Recieve");
client.setCallback(callback);
During the setup stage, the connection between XIAO and the MQTT server is initialized, and the topic subscription settings and callback functions are set. Here we subscribe to the topic XIAO_ESP32/Recieve as an example. When we send a message to this topic from the host computer, the corresponding callback function callback will be executed:
void callback(char* topic, byte* payload, unsigned int length) {
  Serial.print("Message arrived [");
  Serial.print(topic);
  Serial.print("] ");
  for (int i=0;i<length;i++) {
    Serial.print((char)payload[i]);
  }
  if((char)payload[0]=='0'){
    Serial.print("  RUN");
    digitalWrite(speakerPin, HIGH);
    delay(2000);
    digitalWrite(speakerPin, LOW);
    delay(100);
  }
  Serial.println();
}
Here it will first print out the received message, then extract the character at position 0. When the character at position 0, which is the first character, is0, it satisfies the condition for the if statement to perform an action. Here we connect the XIAO ESP32C3 and the expansion board together. When the condition is met, the buzzer on the expansion board will change its level briefly and beep for 2 seconds, while sending the prompt messageRUN to the serial port.
In the process of development and testing by readers, you can also try to integrate the receive and send functions of MQTT, and send messages to specific topics in the callback function, so that the sender can ensure that XIAO has received the message.
On the host computer, we use MQTT X to test. Open MQTT X, the interface is as shown in the following figure.

Click the + New Connection button to enter the connection creation window, as shown in the following figure. Fill in the Name box with XIAO-MQTT-Recieve as the connection name. Host is the broker.hivemq.com we set in the program, and nothing else needs to be set. Click Connect at the top right corner. The interface after successful connection is as shown in the following figure.
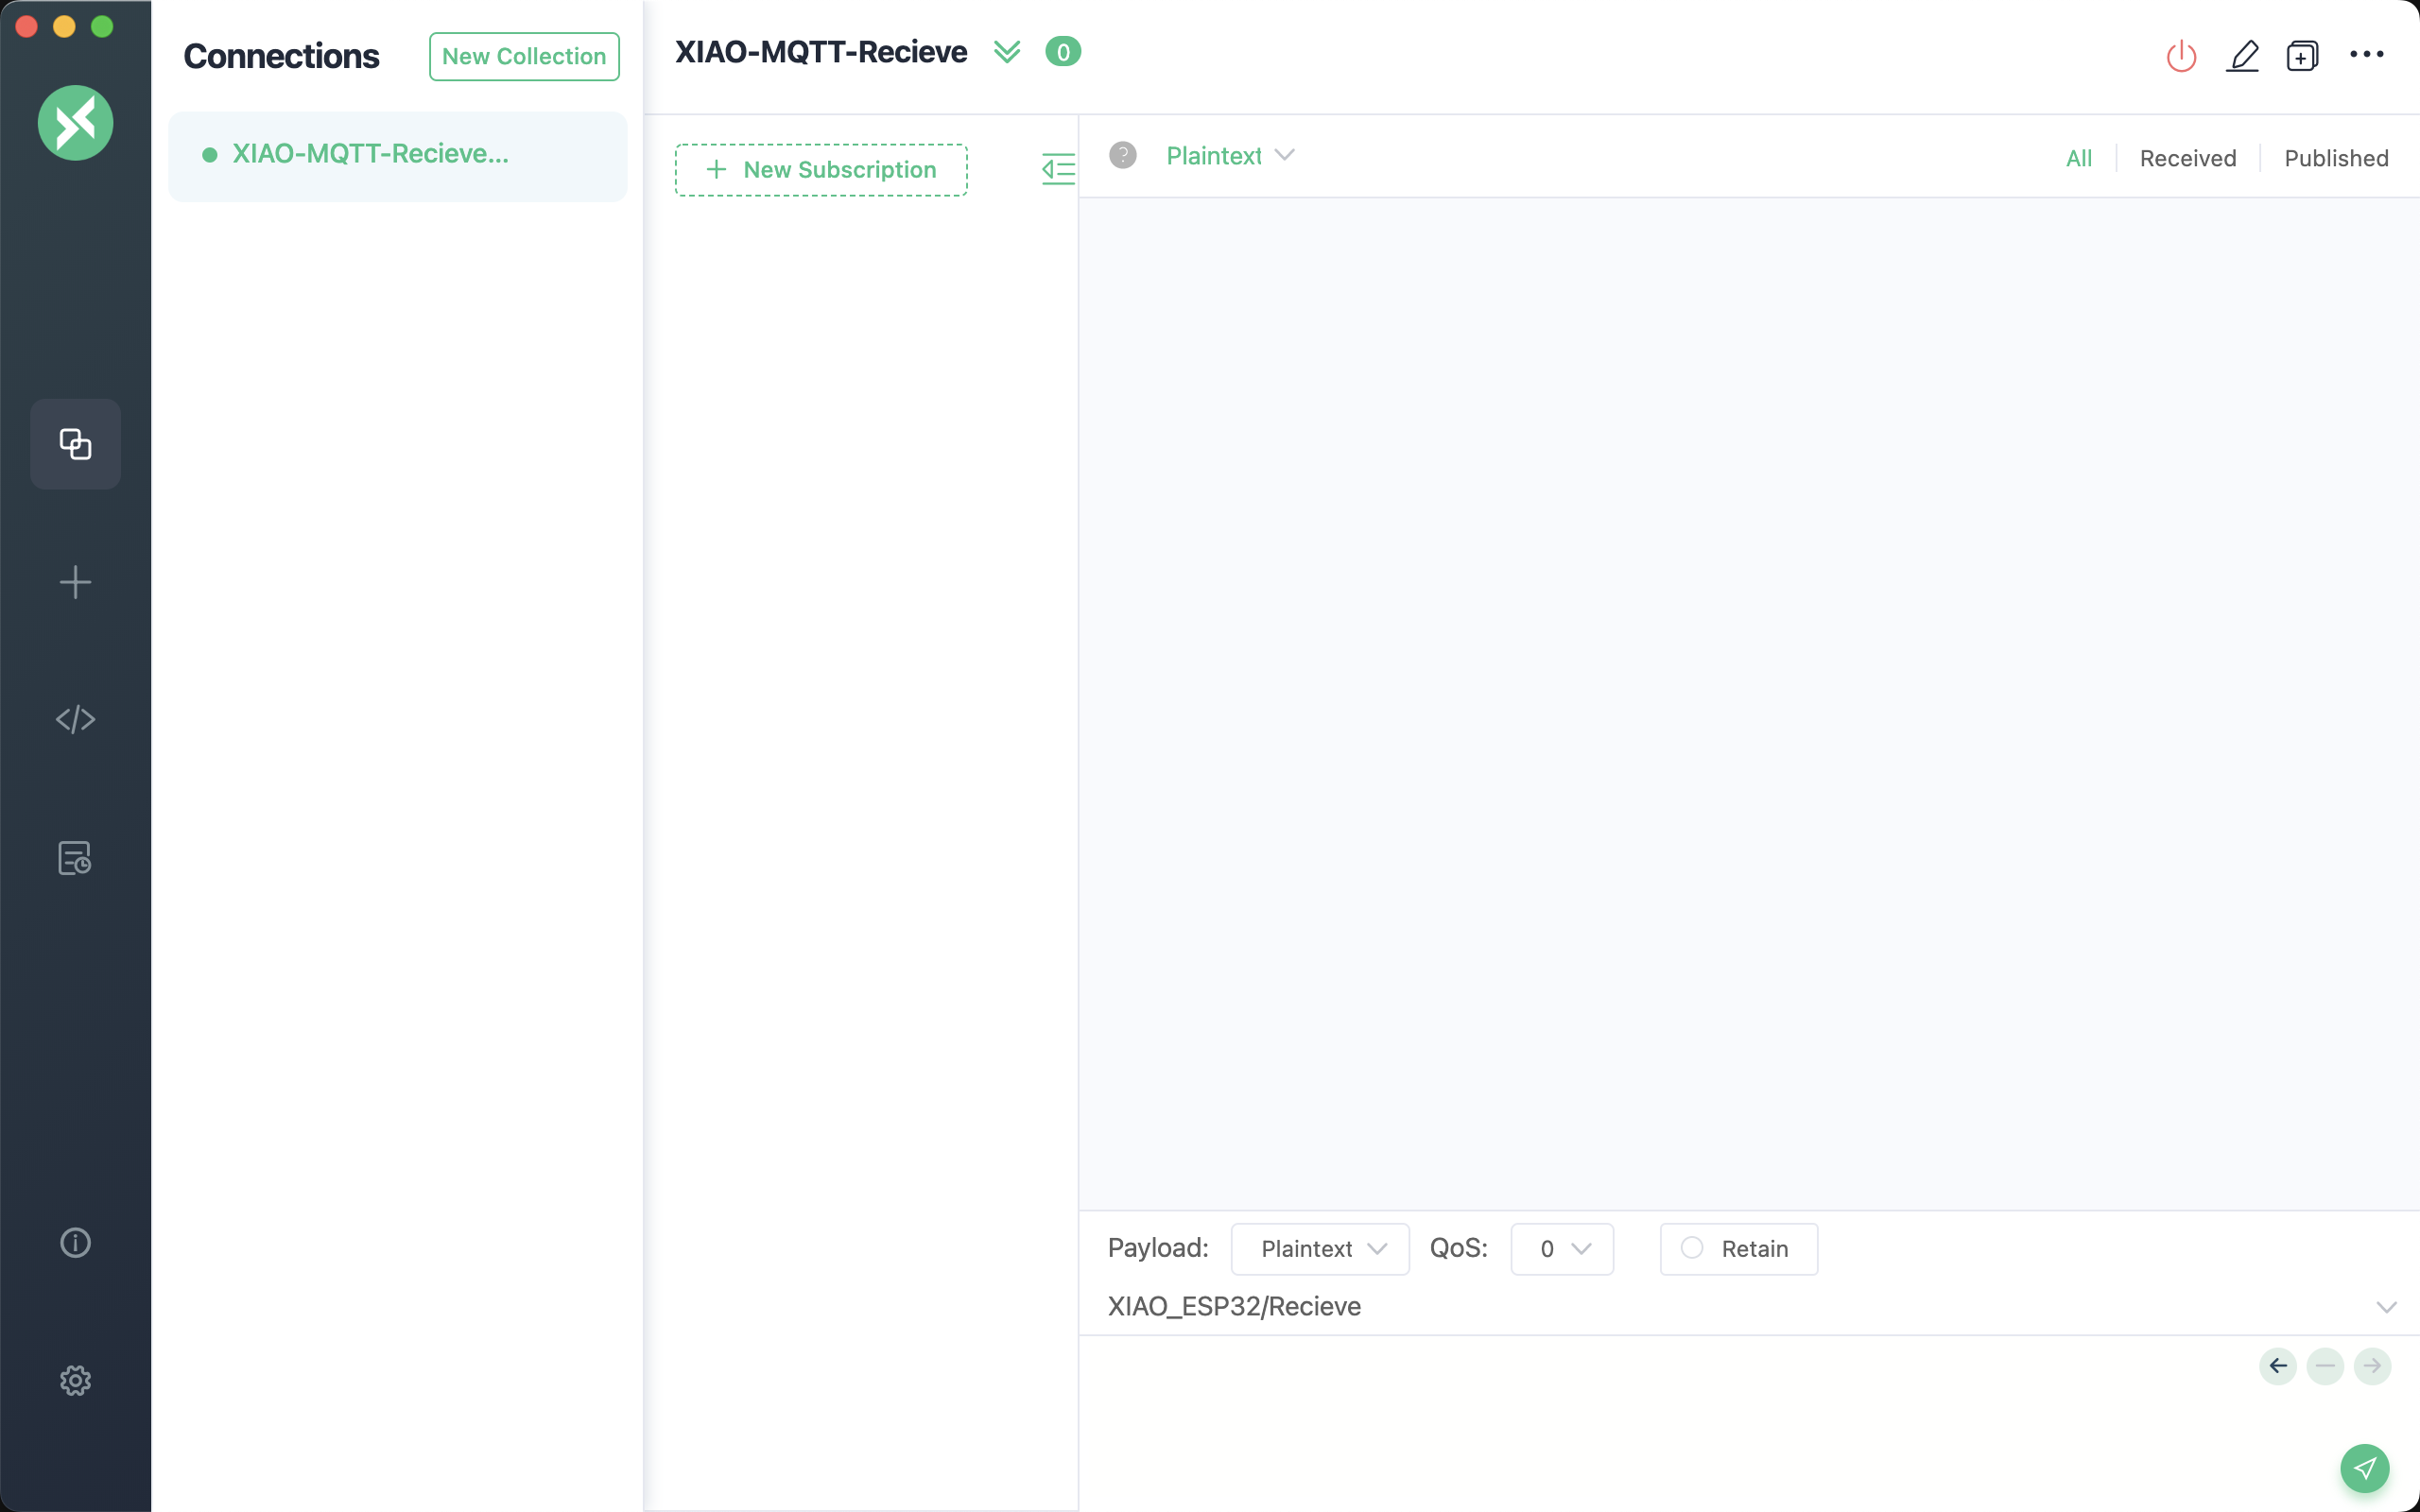
Now we can publish messages to the specified topic, which is the topic XIAO_ESP32/Recieve we subscribed to on XIAO. Then we enter 00 in the input box of XIAO_ESP32/Recieve at the lower right corner of the interface, and then click the send button ![]() in the lower right corner.
in the lower right corner.
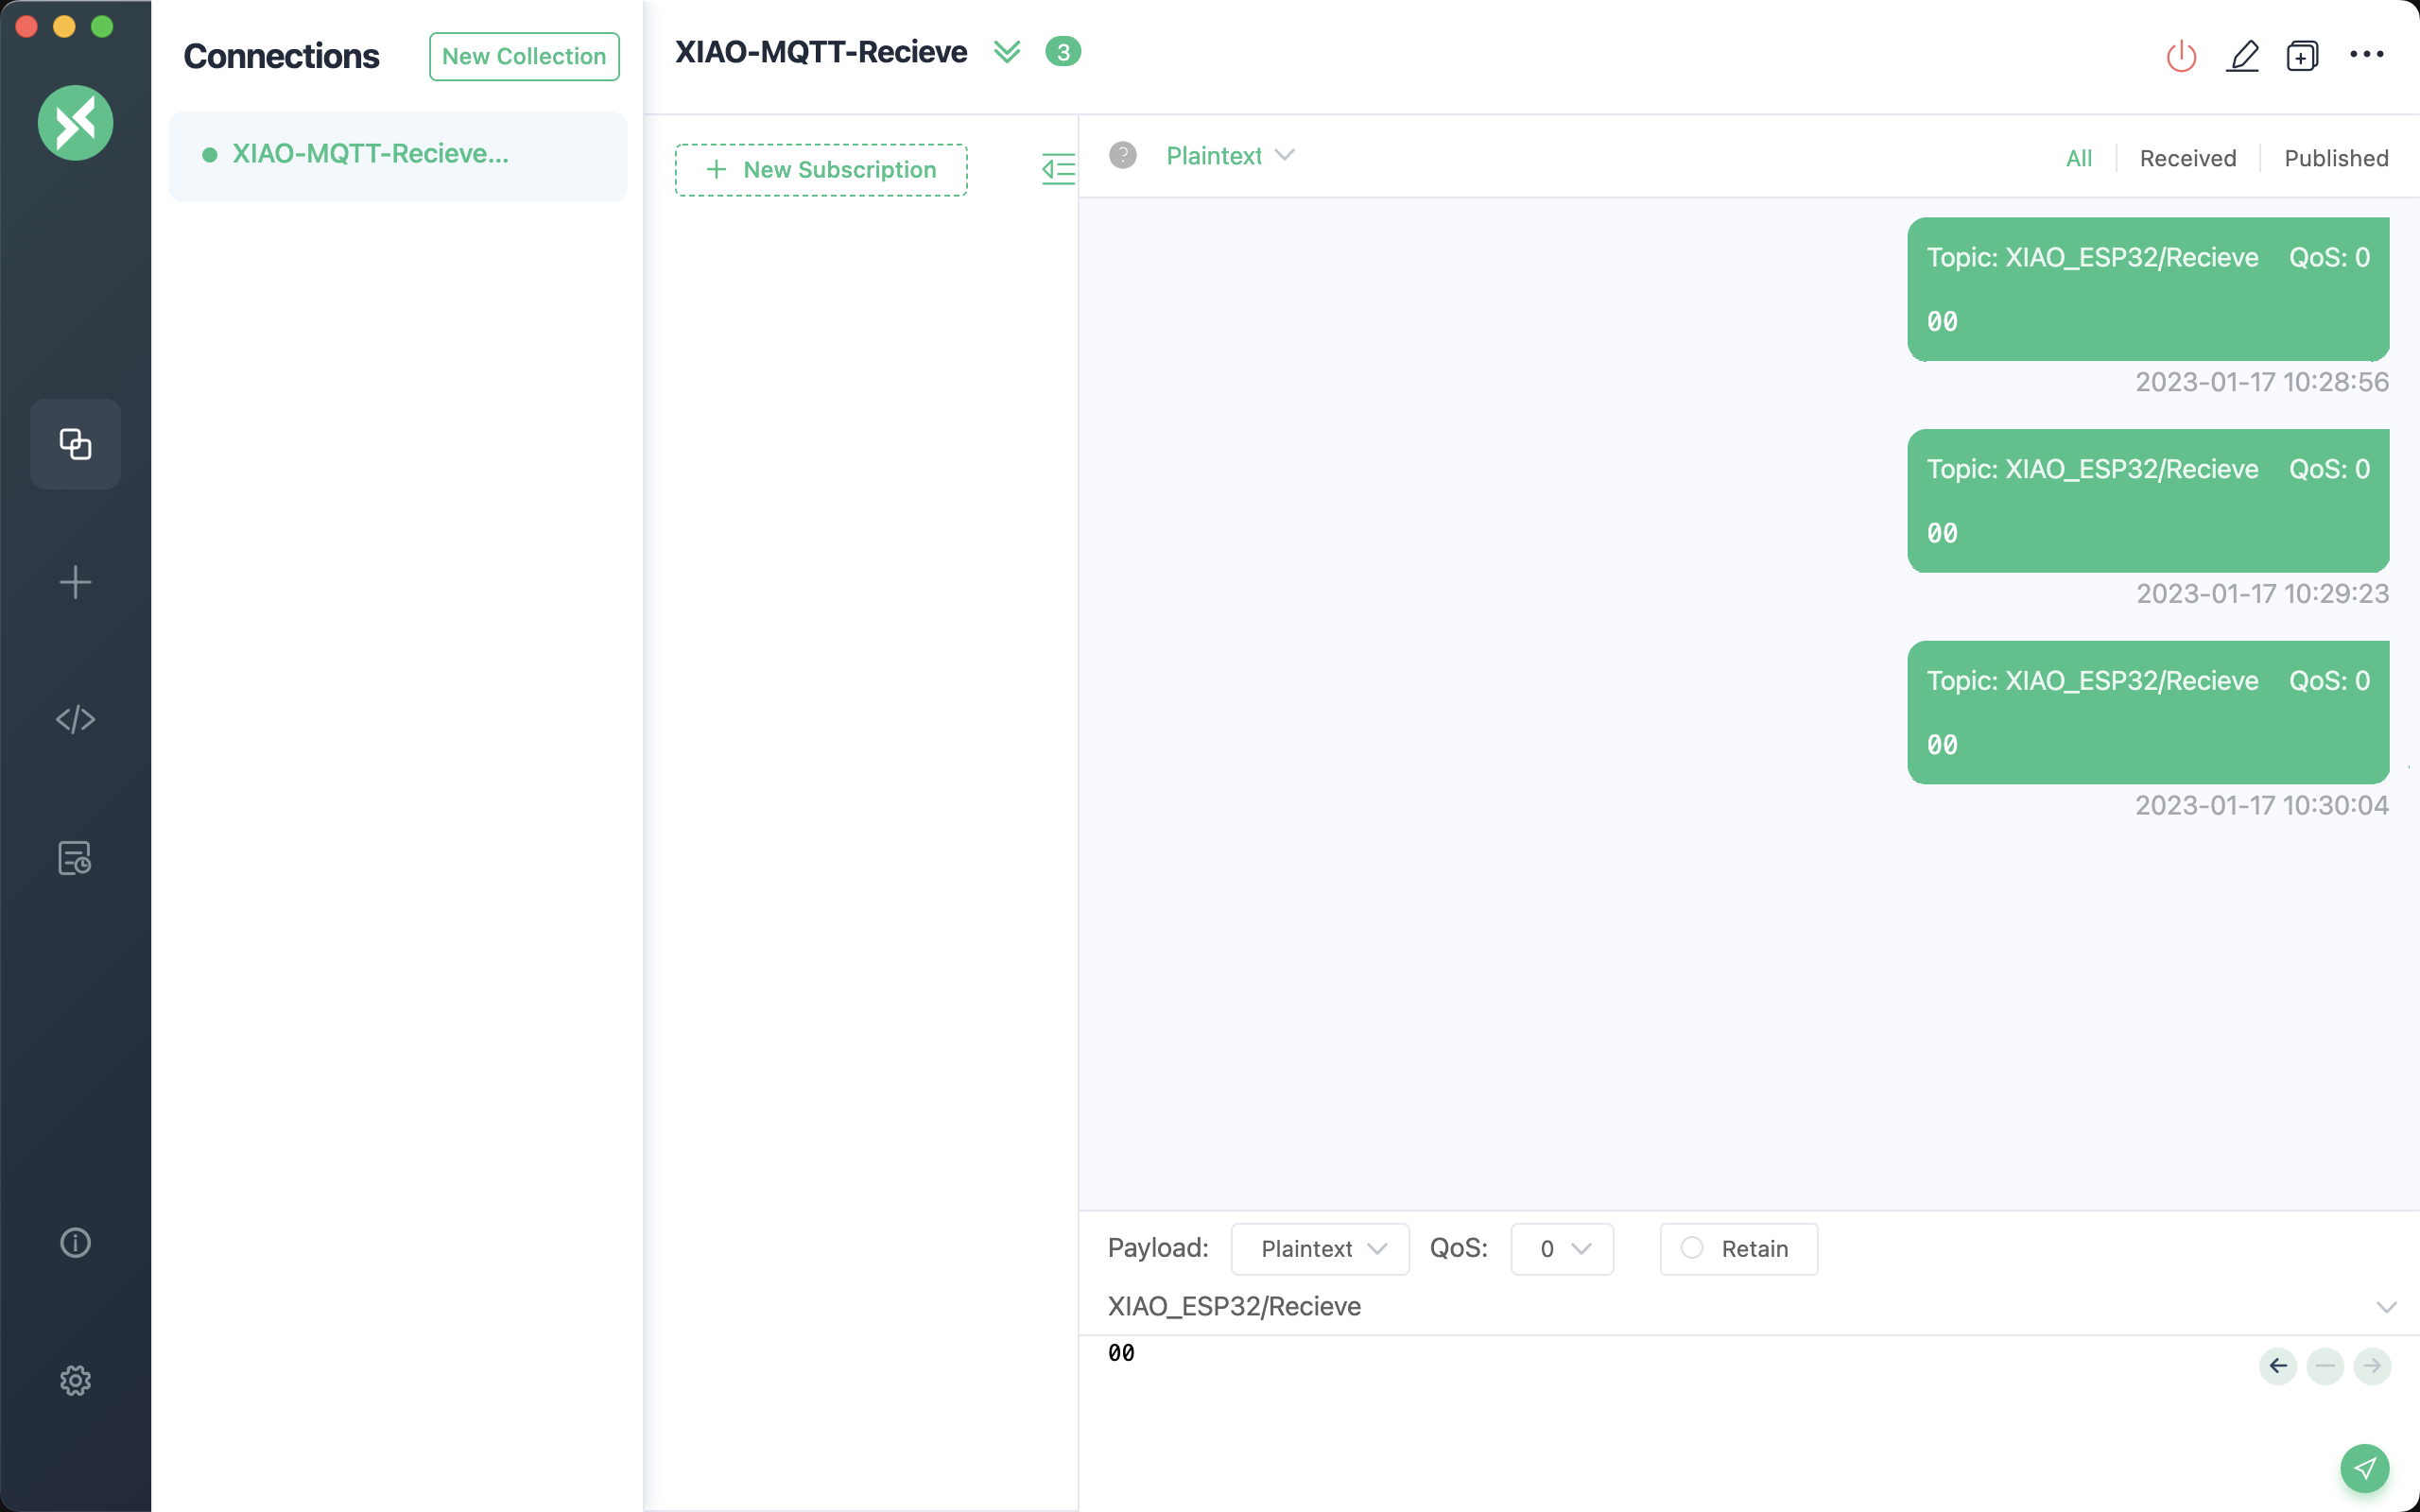
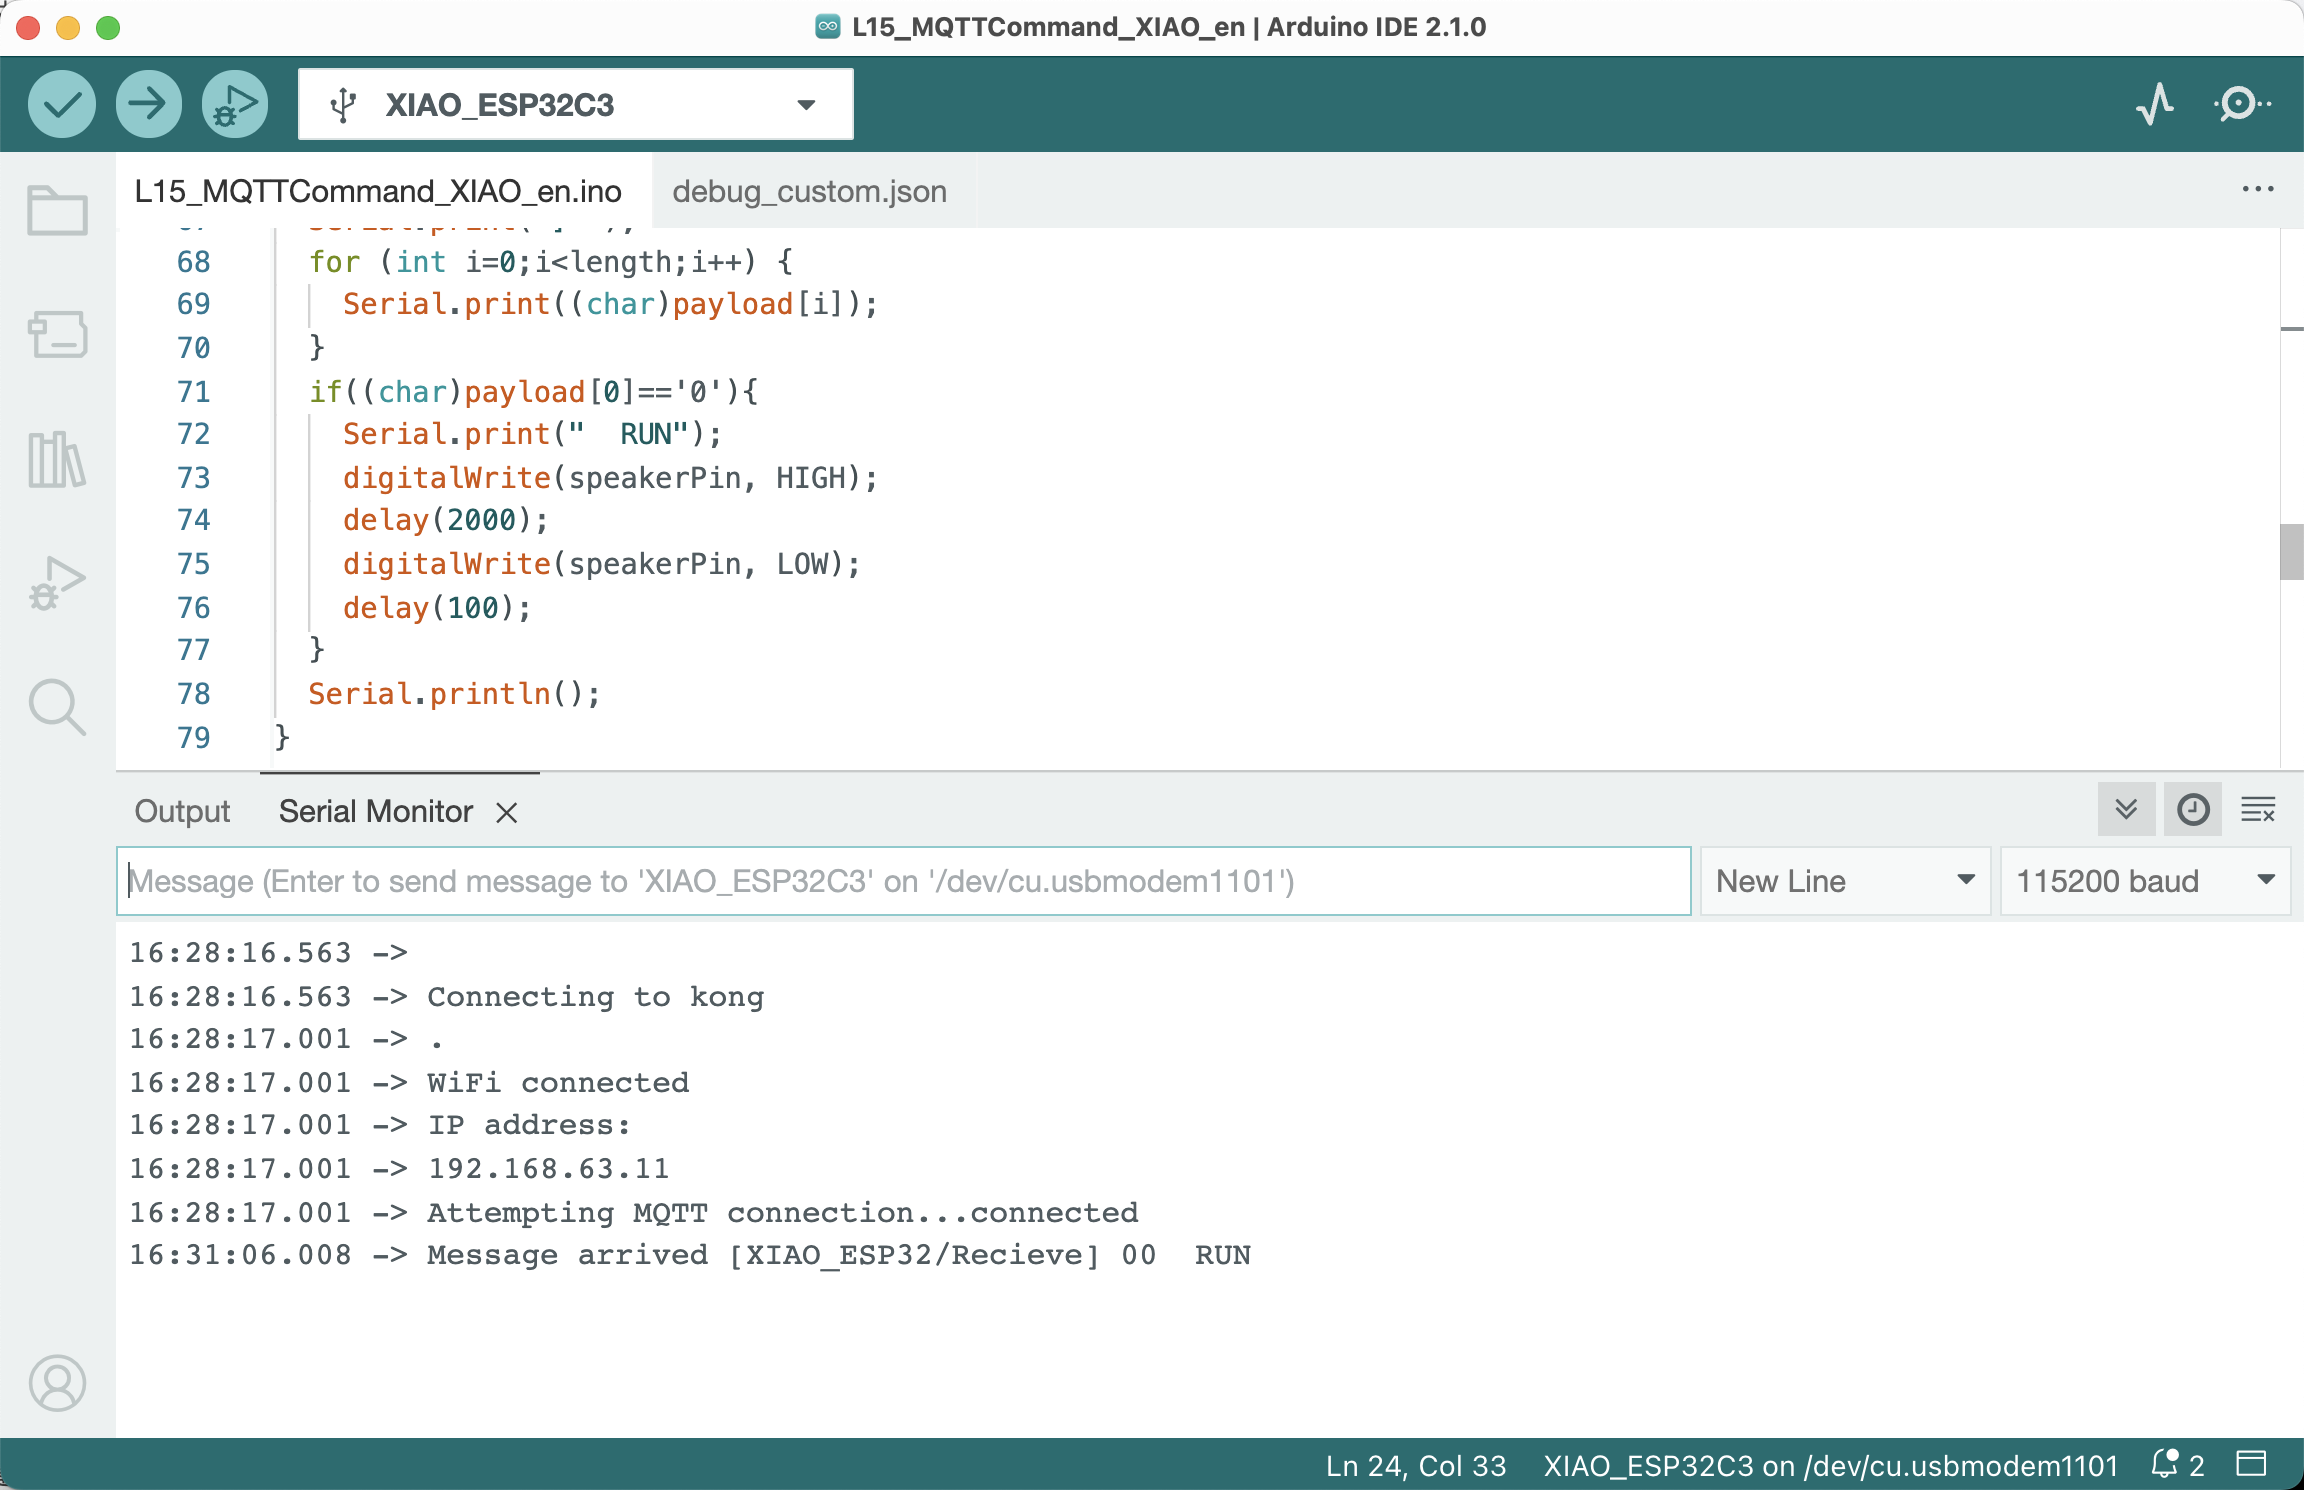
At this time, in the serial monitor on the PC side, you can see the prompt message received from XIAO, as shown in the following figure, and prompt RUN, the buzzer will sound for 2 seconds, indicating that the message has been received.
Now, we have successfully driven the buzzer on the expansion board connected to the Wi-Fi connected XIAO ESP32C3 through the instruction sent by the PC side.
The action of the buzzer can be replaced with the control of any peripheral to achieve the desired function.
Lost connection
If a cloud service needs to send a command to an offline IoT device, what should it do? Again, the answer depends on the situation. If the latest command overwrites the previous one, the previous command may be ignored. If the cloud service sends a command to turn on the heating, and then sends another command to turn off the heating, then the turn-on command can be ignored and does not need to be resent.
If the commands need to be processed in order, such as first moving the robot arm up and then closing the gripper, then they need to be sent in order once the connection is restored.
✅ How can device or server code ensure that commands are always sent and processed in order through MQTT if needed?
Using XIAO’s Bluetooth function
XIAO nRF52840, XIAO nRF52840 Sense, XIAO ESP32C3 all support Bluetooth function, you can refer to the related Wiki documents to learn how to use the Bluetooth function.